Blink Troubleshooting Information

This document is a supplement to the user manualsfor our Blink time lapse controller product for the HERO3+ and HERO4 cameras. If using a HERO5 camera, see our BlinkX Troubleshooting Guide. The manuals should be read in conjunction with the troubleshooting Q & A below.
Before consulting the troubleshooting guide, make sure that:
- Your GoPro is running the most recent firmware available
- Your Blink is running the most recent firmware available
- You are using an SD card that has a minimum read and write speed of 30MB/s (U3 rating) that is required by the GoPro camera for reliable operation. Our website has a link to an SD card speed tester to determine if your SD card has the required speeds for use with the GoPro cameras.
Troubleshooting Questions
Why has my GoPro battery died when Blink is attached to a power source?
Blink's USB port does not charge the GoPro battery. If using a HERO4, the system can be powered through Blink's USB port without the GoPro battery inside the camera. This allows for the system to recover from a camera crash by pulling power from the camera if Blink determines the camera has become unresponsive. Your power supply should be rated for 2Amps at 5Volts when powering the system through Blink. However, if using a HERO3+ or (older HW: F) white Blink, a charged GoPro battery is required for reliable operation and any external power supply should be attached to the GoPro's USB port to keep the GoPro battery charged.
I have Blink powered from an external battery pack. Why does the shooting schedule only last for one day when I still have power in the external battery pack?
Most of the batteries on the market, including ours, have an automatic power saving feature which turns off the battery if the battery is not constantly supplying power to a device. If the GoPro is powered off for more than a few minutes between triggers, the external battery might automatically shutdown due to inactivity. However, our V15 and V44 battery packs have two modes of operation, the standard Automatic Off mode and an Always On mode. Activating the Always On mode is important to prevent the battery from automatically turning off when insufficient current is being drawn due to the camera being turned off by Blink between triggers to conserve power.
If using our V15 or V44 battery, make sure to activate the Always On feature. It is easiest to determine the battery's operating mode when the battery is disconnected and neither charging or supplying power. When in Always On mode, if you double tap the power button a few times, the LED should continue to stay lit between presses. If the LED goes dark between every other double press, you are not in Always On mode. To switch modes, hold down the power button for six seconds. If the charge indicator flashes 3 times and stays lit for a second or two, you are now in Always On mode. If the charge indicator flashes 3 times and then goes dark, you are now in Automatic Off mode. If you are not in the desired mode. Press the button again for 6 seconds to change modes.
The camera system should only use the 2000mA USB port of the V44 labeled "For Tablets" to ensure the battery can supply the power required for the device and maintain the Always On setting. When using the 1000mA port labeled "For Phones", if a device is attempting to draw more power than the regulation of this port, it will result in a safety cut-off of power to the device.
How do I get the latest Blink firmware update?
Blink firmware will be released periodically with new features and/or bug fixes. Head over to this page for instructions.
Why is the Blink firmware not updating when attached to the USB flash drive?
Make sure that the file name has not been changed or Blink will not recognize the file, for example, "blink_update(1).bin" or "blink_update.bin.txt". When updating the Blink firmware with the OTG cable, make sure to have Blink unplugged from the GoPro camera while having Blink and the flash drive connected to the OTG cable before the male USB-A end is plugged into a 5V DC source. The USB flash drive must be using the FAT32 file format to be able to perform the Blink firmware update.
The FAT file saving format is the default format for PC and used with most USB flash drives up to 32GB. Large capacity drives might be using the exFAT format which is not compatible with Blink. Make sure that the drive is using FAT32 which is commonly referred to as just FAT. If you are using a MAC, the following link explains how to format a USB flash drive to the FAT32 format.
How do I turn on Blink WiFi?
Blink WiFi can be turned on via the wired remote that ships with the product. Plug the remote into the port1 (2.5mm jack) on the side of Blink (on the opposite side from the mini USB port.

Hold down the wired remote button for 3 seconds - you will see the LED on the back of Blink flash cyan three times to indicate WiFi signal has been enabled. The LED will continue to flash blue every 5 seconds while WiFi is active. Blink WiFi can be turned off manually by pressing the wired remote button again for 3 seconds and the LED will flash cyan twice to indicate WiFi is turned off. WiFi will also automatically turn off after 15 minutes.
Why does Blink's WiFi not activate when I use the remote?
Blink requires more power when the WiFi signal is active. If Blink's LED flashes purple, this is typically an indication of insufficient power available to activate the WiFi signal. Make sure to use a fully charged battery or have a 5V 2A external power source plugged into Blink when activating WiFi. Once the new shooting schedule has been programmed, WiFi is no longer needed for regular operation and the system can continue to run off a lower charged battery.
When connected to Blink's WiFi, why does my device indicate that there is "No Internet Connection"?

Blink broadcasts a WiFi Access Point signal for programming that does not provide an external internet connection. This notification is indicating the WiFi network you are connected to does not have external internet access and you will not be able to access websites or use other internet features when connected to Blink's WiFi signal. Your webbrowser can only access the Blink's User Interface page when connected to Blink's WiFi signal. When connected to Blink's WiFi signal, you can use any webbrowser, such as chrome or safari, to access the Blink's Programming User Interface by navigating to the page http://192.168.1.1
When I try to access the Blink UI page, why does my browser indicate "this site can't be reached"?
Ensure that your device is connected to Blink's WiFi network. The Blink User Interface can only be accessed when connected to Blink's WiFi access point signal. If your device has a pop-up message indicating "internet is not available" you may need to accept/dismiss this notification before you are able to access Blink User Interface webpage.

Why does my device not stay connected to Blink's WiFi signal?
Some phones and computers have a WiFi setting that will automatically connect to a known WiFi network with the strongest internet signal rather than staying connected to Blink. Since connecting to Blink's WiFi network does not provide external internet access, some devices will not stay connected. You might need to temporarily deactivate this setting or remove other known networks in the area for the period required to set up the new shooting schedule of Blink.
When I have previously connected to Blink's WiFi on my device, why is it now indicating an incorrect WiFi password?
If Blink's WiFi is password protected, the default password is: 1234567890 and cannot be changed. If you have previously connected to Blink's WiFi but the connection is not working, you should to remove Blink from your known WiFi networks before reconnecting to Blink's WiFi signal.
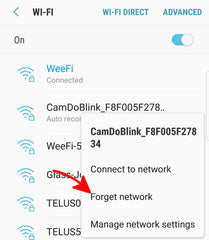
I have an iPhone/iPad and am having trouble connecting to Blink WiFi. It used to work fine?
Make sure to try the step above, which is to forget the Blink WiFi network and try again. If that is not working you can try the following:
Disable Location services for Wi-Fi Networking
Turning this feature off will not disable Wi-Fi completely. Only those location services that are being used for wireless networking will be disabled.
- Go to your iPhone Settings.
- Tap Privacy.
- Tap on Location Services.
- Select System Services.
- Toggle the switch next to Wi-Fi Networking to turn the feature OFF.
- Try to connect to your Wi-Fi network with Wi-Fi network services turned off.
Reset Network Settings
Resetting the network settings often helps in resolving network-related issues occurring on any device. The process will erase current network settings and restore them to defaults. Network caches, DHCP settings, and other network-related information are also flushed in the process.
NOTE: This will delete all your WiFi passwords and all networks your phone has ever connected to.
- Navigate to Settings.
- Tap General.
- Select Reset.
- Tap on Reset Network Settings.
- If prompted, tap OK or any other given options to proceed and confirm the network reset process. Wait for the network settings to reset completely.
Why does my device disconnect from Blink's WiFi when sending Blink Email?
The WiFi network that is broadcast by Blink for programming is a WiFi Access Point that is a "WiFi Host Mode" and does not provide external internet access. When using Blink Email, Blink will automatically turn its WiFi signal on/off in "WiFi Client Mode" to allow connection to a router's WiFi network that has internet access for the few seconds required to send the daily email notification. If accessing the Blink's programming UI while Blink Email is scheduled, your device will be disconnected from Blink since Blink's WiFi needs to switch from Host Mode to Client Mode to send the email notification.
Why am I not receiving any notifications from Blink Email?
Blink must be running firmware v2.02.00 or newer to access CloudX to send the Blink Email notification. Blink requires a WiFi signal in range of the camera with internet access that is broadcasting a 2.4GHz 802.11 b/g/n WiFi signal for sending out the status email. Each new Blink includes a 2week free trial of the Blink Email service before a subscription is required to continue to receive email notifications. If you have purchased a CloudX subscription, the email account that will be contacted by Blink must be the email account that was used to purchase the subscription for Blink to locate and activate the subscription. The email account(s) that will be notified by Blink Email can be managed through your CloudX account.
Check the Blink Error Log from the page http://192.168.1.1/log.html when connected to Blink's WiFi network to determine if you have any router problems. Status codes in the 10's are associated with Blink Email and outlined in the following LINK. If you are receiving status code 21, check your spam/junk email folder for messages from cloudx@cam-do.com.
Why is my email notification indicating more/less triggers than what was scheduled for the day?
Blink's notification email indicates the number of camera triggers since the last notification was successfully sent to CloudX. If there was any day(s) the connection to the internet for the email notification was unsuccessful, the next successful notification trigger count will include triggers for the current day as well as the day(s) that you were not previously notified.
If the trigger counts are occasionally more or less than the scheduled number by 1, this could be due to clock synchronization. Since clock drift will occur on all devices that are not regularly re-synchronized, including wrist watches, microwave ovens, etc. our CloudX service will ensure that the camera time remains accurate by re-synchronizing the time each day when Blink is connected to the internet to send the email notification. If the email notification time and a camera trigger time overlap or are only 1 minute apart, and the clock is running slightly fast or slow, this may result in an extra or missing camera trigger. To avoid extra/missed triggers due to clock synchronization, adjust your notification email time to be scheduled at least a few minutes before/after any scheduled camera triggers.
If the trigger counts are irregular, check on the Blink controller to view the Error Log from the page http://192.168.1.1/log.html when connected to Blink's WiFi network to determine if you have camera communication problems. Status codes in the 200's are associated with failed camera communication and outlined in the following LINK.
What happens if there is a conflict between schedules?
If multiple schedules have been set and there is a conflict between the start times, priority is given to the lower numbered schedule. For example, schedule 1 has priority over schedule 2.
Blink is turning the GoPro on at the scheduled time, but why is the shutter not being triggered?
Make sure your GoPro HERO3+ or HERO4 camera has been updated to the most recent firmware available on GoPro's website. Blink will only work with GoPro firmware v3.00 or newer.
If your GoPro briefly (or continuously) enters USB mode when the camera is turned on (indicated by a USB symbol on the front GoPro display), the camera can be slow to respond and prone to failure. The shutter cannot be triggered while the GoPro is in USB mode and the GoPro camera will enter USB mode if the data lines of the USB cable are connected. If your camera is entering USB mode, try using another USB cable without the data lines, a different 5V power source, or a USB data blocking adapter.
If running Blink firmware v2.00 or earlier, make sure you do not have have the "Enable Scripting" checkbox enabled at the top of the UI. If this checkbox is enabled, Blink will only turn the camera on at the scheduled time with no further function since it expects a script on the camera's SD card to control the functionality once the camera has been turned on. If you are not using scripts, make sure to disable this checkbox for regular operation. If you are scheduling scripts, see the following link.

How do I program a schedule to span overnight?
Each of Blink's separate schedules repeats weekly on the specific days that are enabled. If you need a schedule to span overnight, since each day is scheduled separately, you cannot have a start time for a schedule that is before the end time. For an overnight shooting schedule, you will need to use two separate schedules. The first schedule should have the desired start time with an end time at 11:59PM. The second schedule would then start at 12:00AM (or adjusted to maintain the desired interval) and have the end time scheduled when needed.
Why can I not set an Intervalometer schedule with an interval between triggers that is less than 60seconds?
Blink is typically used for intervals greater than 60seconds, as it allows Blink to turn the camera off between intervals to conserve battery. The minimum interval for Intervalometer-Photo is 60seconds between photo triggers. If you require a shorter interval than 60seconds, this can be done on the HERO4 by using the GoPro's native "time lapse video" setting to allow the capture of 0.5 , 1, 2, 5, 10, 30, and 60 seconds between images.
To schedule a short interval time lapse video, first set the GoPro's standard "Time Lapse Video" at the desired interval as the default video mode from the GoPro setup menu. Once time lapse video has been set as the default video mode, programming a Blink schedule for Intervalometer-Video will allow you to set the start and end time to begin recording. Using a video schedule will switch the camera mode to the default video mode to record the standard video time lapse function of the GoPro camera. The use of Time Lapse Video produces a video clip from each scheduled trigger rather than a set of images. A set of photo and/or video clips can be stitched together to generate a continuous time lapse video using GoPro Studio and other video editing programs.
What is a "Camera On" schedule and can I use it to keep the GoPro camera on between scheduled triggers?
The GoPro cannot remain on between scheduled triggers and Blink will turn off the GoPro after a camera trigger. Scheduling a "Camera On" action turns the camera on at the scheduled time with no further action, such as switching camera modes or triggering the shutter to capture footage. This can be used for scheduling a USB download window, or for using the camera's HDMI video output signal rather than recording to the camera's SD card. Setting a camera on schdule with an active duration of 0seconds turns the camera on with no specified off timer for use with scripts that will control the camera functionality once the camera has turned on.
How do I program Blink for script operation?
Scripting can be enabled on the HERO4 camera using our custom CamDo HERO4 csiFirmware. A script on the camera's SD card will run each time the camera is turned on regardless of the Blink settings. If Blink is not scheduled for "script mode" operation, Blink may trigger the camera's mode/shutter functions or turn the camera off before the script commands have completed.
If running Blink firmware v2.00 or earlier, there will be an "Enable Scripting" checkbox at the top of the UI. If this checkbox is enabled, regardless of the scheduled action selected, Blink will only turn the camera on at the scheduled interval times with no further function since it expects a script on the camera's SD card to control the functionality once the camera has been turned on.
Starting in Blink firmware v2.01, the "Enable Scripting" checkbox is removed from the Blink UI and scripts can be triggered using the "Camera On" action with a time of 0seconds. This "Camera On - 0seconds" schedule will function like the previous "Script Mode" by only turning the camera on with no shutter command or end timer since the camera should be turned off via the script on the SD card.

If a 1minute start delay ("sleep 60" command) is set at the beginning of the script, this will allow for images to be triggered in separate schedules. This is because during a Blink photo trigger, the camera is turned off by Blink before the next commands of the script are executed. For example, our Pro-csiFirmware can be used to schedule an Active WiFi Window for a set time each day or week for the GoPro's WiFi to remain active for downloading and clearing the SD card using the GoPro App before the camera and WiFi are both turned off to conserve battery.
Why is my continuous video footage being split into multiple files?
The splitting of the files into sections is called "chaptering", and the final video clip can be joined back into a single file by using GoPro Studio, Adobe, or another video editing software. The length of each file is determined by the recording mode used but has a maximum file size of 4GB per file. This is because the GoPro camera saves files to the SD card in the FAT32 format which has a maximum file size of 4GB. The GoPro requires that the SD card has a FAT32 format for 32GB and smaller cards, or exFAT for 64GB or larger cards, however, the file will still be saved in the FAT32 format that has a maximum file size limited to 4GB. A benefit of chaptering a recording into multiple files is that it reduces the chance of losing the entire footage if the power is suddenly lost, the camera crashes, or another issue causes the last recorded file to become corrupted to the point where it cannot be repaired by the camera.
What can I connect to the circular jacks on my Blink?
Blink's Port1 is used to activate the Blink's WiFi signal and is typically used with the included wired remote.
Blink's Port2 is used for Motion Detection operation and information about this port is located in our Blink User Manual.
Please connect only CamDo approved accessories to these jacks. Do not connect any live voltage source, such as your solar panel or battery, to these jacks. Doing so may damage your equipment.
What are the status codes in the Blink Error Log?
When Blink encounters a problem, an entry is saved into the Blink Error Log. You can access the Blink Error Log when connected to Blink's WiFi and using your webbrowser to navigate to the URL: http://192.168.1.1/log.html or by clicking the Error Log link at the bottom of the standard Blink programming UI.

A few of Blink's status codes are as follows:
- STATUS_CODE: 11 is an indication that "Blink has located the SSID but failed to send the status email". You must update your Blink firmware to v2.02 or newer receive Blink Email notifications.
- STATUS_CODE: 14 is an indication that Blink has "successfully joined the WiFi network".
- STATUS_CODE: 15 is an indication that Blink "failed to join the WiFi network".
-
STATUS_CODE: 16 is an indication that "Blink Email has the incorrect password to the WiFi network"
Blink has a 32 character limit on the password. If your WiFi password is longer than the character limit, Blink will truncate the password field causing a failed connection. For use with Blink Email, please ensure your WiFi password is below the character limit. -
STATUS_CODE: 17 is an indication that Blink "Blink can't connect to the SSID". This may indicate that your WiFi router is out of range or is unavailable.
Blink and the GoPro cameras do not have as advanced of a WiFi antenna as most routers (or phones/computers) so they may have difficulties transmitting to the router although they can detect the WiFi network from the router. We always recommend that the router should be placed as close to the GoPro as possible to provide an adequate signal strength from the GoPro camera to the router.
Some WiFi routers, typically 3G & 4G routers, have a power/data saving mode that should be disabled. If the router is in a low power rest/sleep mode, it may take awhile for the router to "wake up" into the fully powered state causing an unsuccessful email attempt. -
STATUS_CODE: 18 is an indication that "the SSID was not found" or that you are "attempting to connect to WPA PSK without a password"
Blink has a 32 character limit on the SSID. If your WiFi network's SSID is longer than the character limit, Blink will truncate the field causing a failed connection. For use with Blink, please ensure your WiFi SSID name is below the character limit.
Make sure that WiFi router is in range of Blink. Note that Blink does not have as advanced of a WiFi antenna as most phones/computers so Blink may have difficulties transmitting to the router although you can detect the WiFi signal with another device in the same location. We always recommend that the router should be placed as close to the GoPro as possible to provide an adequate signal strength from Blink to the router. - STATUS_CODE: 19 is an indication that Blink "successfully synchronized the clock time and date with the NTP server".
-
STATUS_CODE: 20 is an indication that Blink "failed to synchronize the clock time and date with the NTP server".
This can indicate that an internet connection is unavailable on the WiFi network. Some routers, typically 3G & 4G routers, have a power/data saving mode that needs to be disabled (or scheduled to be fully powered/connected before Blink Email is scheduled if this option is available) for use with Blink Email. If the router's power/data saving mode is active, the router might be broadcasting the WiFi network so that it can be located and connected to, however, the router is not connected to the internet to conserve power/data during periods of inactivity. Once a device has connected to the WiFi signal, it may take awhile for the router to connect to the internet causing an unsuccessful attempt. - STATUS_CODE: 21 is an indication that Blink has "successfully sent a status update to CloudX".
- STATUS_CODE: 22 is an indication that Blink has "failed to send a status update to CloudX". Blink has a 32 character limit on the email address. If your registered email address for the Blink Email subscription is longer than the character limit, Blink will not be able to locate your subscription on the server. Contact support@cam-do.com to transfer your subscription if your registered email address is longer than the 32 character limit allowed for Blink Email.
-
STATUS_CODE: 201 is an indication that Blink "was not able to turn the camera on"
When 201 occurs, it is typically an indication that the system either has insufficient power to turn on the camera, the GoPro has crashed and is no longer responding, Blink is not connected to the GoPro, or that Blink has not been correctly initialized after a firmware update.
- GoPro camera crashes are typically due to the use of an SD card that does not meet the GoPro camera's read and write speed requirements. A slow SD card can affect the timing of both the Blink and GoPro camera making the system prone to failure. Our website has a link to an SD card speed tester to determine if your card has the required speeds for use with the GoPro camera: http://cam-do.com/pages/sd-card-speed-tester .
- Typically power is provided to the GoPro through Blink's USB port with the GoPro battery removed to allow for the reset feature (status 251) that allows for the system to recover from a camera crash. The power supply must be able to provide at least 2Amps at 5Volts when the GoPro battery is removed. If using the GoPro battery, as required for HERO3+ and our older white colored Blink (Blink_HW:F), the GoPro's USB port must be connected to charge the GoPro battery. Blink's USB port does not charge the GoPro battery, and a low charged GoPro battery will result in 201 errors.
- After a Blink firmware update, you must click the "Clear All" button to delete all previously saved information before re-programming your desired schedules. If you do not use this button to clear the schedules, information saved before the firmware update, but no longer displayed, may interfere with your newly programmed shooting schedules.
-
STATUS_CODE: 202 is an indication that "the camera is busy and did not respond to the command request".
251 errors are typically due to the use of an SD card that does not meet the GoPro camera's read and write speed requirements or the camera has entered USB mode. - A slow SD card can affect the timing of both the Blink and GoPro camera resulting in issues such as: corrupted footage, overheating, missed triggers, and camera crashes.
The GoPro camera requires an SD card with a minimum read and write speed of 30MB/s (U3 rating) for reliable operation. An SD card's read/write speed can significantly decrease as the card becomes more full, and drop below the required 30MB/s read/write speed if the card is not U3 rated. Our website has a link to an SD card speed tester to determine if your card has the required speeds for use with the GoPro camera: http://cam-do.com/pages/sd-card-speed-tester . - The GoPro camera will not respond to commands from Blink or the physical camera buttons when in USB mode. If the camera is switching in and out of USB mode, it can be slow to respond and prone to failure. The GoPro camera will enter USB mode if the data lines of the USB cable are connected to the GoPro camera. If your camera is entering USB mode, try using another USB cable without the data lines, a different 5V power source, or a USB data blocking adapter.
- STATUS_CODE: 250 Blink is running old firmware. See our Blink Firmware Page for information on updating your Blink controller. See status 201 for causes.
-
STATUS_CODE: 251 is an indication that Blink has attempted to "reset the GoPro camera" to recover from a potential camera crash.
This feature is only available when using a HERO4 camera and the system is powered through Blink's USB port (black colored Blink only - BLINK_HW:H) with the GoPro battery removed. The HERO3+ camera and older white colored Blink (BLINK_HW:F) require a charged GoPro battery inside the camera for reliable operation and cannot use this reset feature.- If running Blink firmware v2.01 or older, see status 202 for causes. Also see our Blink Firmware Page for information on updating your Blink controller.
- STATUS_CODE: 254 Blink is running old firmware. 254 is an attempt to "reset the GoPro camera", see status 251. Also see our Blink Firmware Page for information on updating your Blink controller.
Why does my Blink Log show dates from Jan1, 2015?
The GoPro camera has a small internal (not removable) battery that is used to retain the clock time when all power is removed. The GoPro has either crashed or lost power for a period of time causing the clock time and date to become reset to the default of Jan1, 2015. When all power is removed, Blink will only retain the programmed shooting schedule but does not have an internal battery to retain the time and date settings. When power is restored to Blink, it will determine the clock time and date information from the GoPro camera to resume the shooting schedule.
I didn't find the answer in the Troubleshooting Guide, what is the next step?
Please contact CamDo support and provide information about your setup and problem including:
- GoPro camera type and firmware version
- Blink firmware version
- Type of SD card being used
- Type of power supply being used
- Is the external power supply attach to the GoPro or Blink's USB port
- Is the GoPro battery inside the camera
- A screenshot of your Blink schedule(s)
- A screenshot of Blink's Error Log from this page: http://192.168.1.1/log.html