Introduction
For long term time lapse, your power solution needs to be reliable, requiring minimal to zero user intervention. While the use of a small solar panel (SolarX) with our power conserving time lapse controllers (Blink/BlinkX/UpBlink) provides a great standalone camera system, for locations that receive low sun exposure or use a wifi/cellular hotspot, solar power may not be an option. On many construction sites, typically some source of AC power is available for workers via a mains power electrical outlet or generator. These can provide an excellent option to maintain power or regularly top up the battery pack of the camera system. This article describes how an AC extension cord can be used to provide a weatherproof power connection within CamDo’s Outdoor Enclosure (DryX).
Equipment Required
What you will need :- AC mains power outlet*
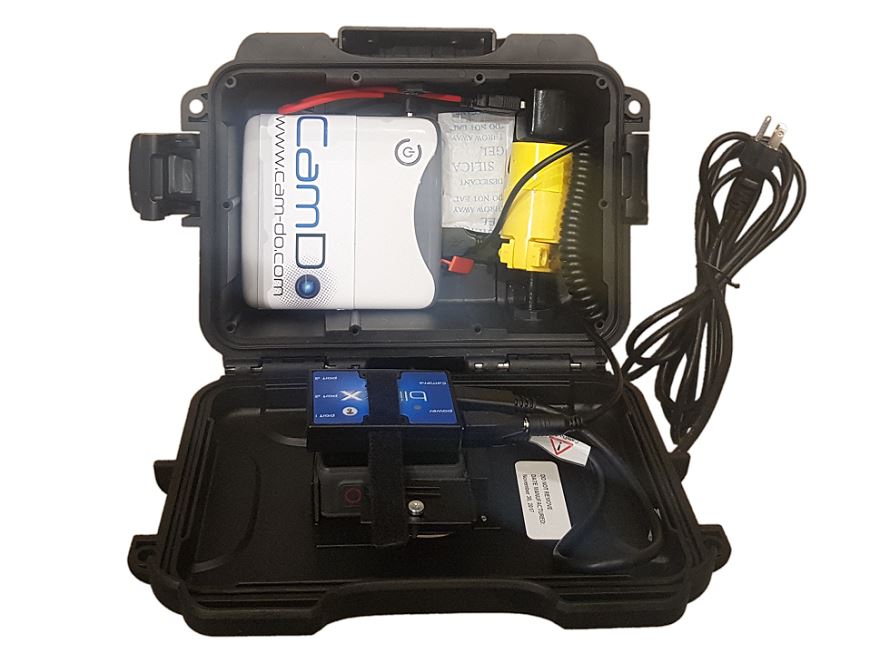
- DryX enclosure
- Time Lapse controller board (Blink/BlinkX)
- V50 battery pack (recommended)
- USB AC-Adapter, rated for at least 2Amp output*
- AC extension cord*
- Female extension cord socket*
*ensure any electrical parts have the required safety ratings, such as “UL”
Quality of Electrical Supply
When you have a stable and reliable power supply, this can be used to directly power the camera system. However, where reliability of the AC power supply can be an issue, such as when there is risk workers tripping the circuit breaker, or the requirement to temporarily shut off the AC power supply, theV50 battery can be used as an Uninterruptible Power Supply to maintain power to the camera system. The V50 can power the time lapse system for days or weeks on a signal charge (approximately 20 days when capturing images 9am-5pm with a 5 minute interval).
CamDo has a simple Time Lapse Calculator to determine how long your battery pack should last without recharging if permanent power becomes unavailable or briefly lost. It can also guide you through the shooting schedule required to produce your video clip and the SD card capacity needed to capture the full length of the project. These tools are specially handy in planning for a construction time lapse setup.
Note that most USB battery packs often have an automatic turn-off circuitry that detects when very little to no power is being drawn and automatically turns off the internal battery circuitry to save power. These batteries, however, do NOT turn back on automatically and require user intervention. Our V50, V44, and V15 battery packs differ from other standard USB batteries due to an Always On mode, that is important to prevent the battery from automatically turning off due to inactivity, since very low current is being drawn when the camera is turned off between triggers by our controllers to conserve power.
Instructions
Installing the extension cord
The extension cord end can be inserted into the DryX enclosure to provide a weatherproof connection for the camera system, while the male end should be protected at the electrical outlet. To insert the AC extension cord into the DryX enclosure, the female end of the cord must be removed to allow for the cord to enter the housing through the cable gland. This can be done by following the steps below. If unfamiliar with electrical repairs, have a professional perform these operations.
- Ensure the male end of the extension cord is disconnected from electrical power before performing any service to the female socket.
- Cut the extension cord near the female end to remove the old female socket and allow the cable the enter the DryX enclosure.
- Using wire strippers or a knife, remove ~2 inches of the outer insulation from the end of the extension cord. This will reveal a set of three colored insulated wires. Ensure you have not cut through the insulation of the inner set of wires. If any of the inner wire’s insulation has been damaged, cut off the inner wires and repeat this step (carefully). Exposed metal wires can result in a short circuit that may damage the system.
- Strip ~½ inch of insulation from the ends of each of the individual wires. This will reveal the bare copper wire underneath.
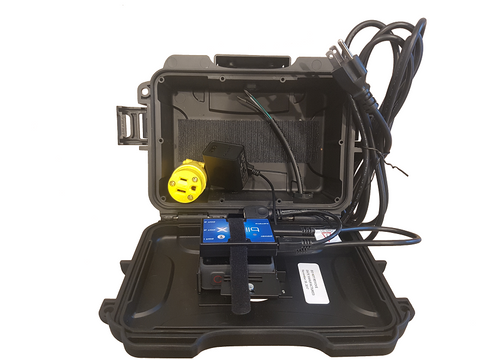
- Loosen the cable gland at the bottom of the DryX enclosure and thread the exposed extension cord wire through. Tighten the cable gland around the extension cord to provide strain relief to prevent the cable from slipping out of the enclosure.
- Open the new female replacement socket by removing the external screws with a screwdriver.
- Insert the cord through the cable clamp on the rear of the female socket.
- Terminate the individual wires from the extension cord to the on the inside of the female socket. in the following order. Typically the black wire to the copper-colored screw, white wire to the silver-colored screw, and green wire into the green-colored screw. If your extension cord parts to not match this color and if unfamiliar with electrical repairs, have a professional perform this operation. A multimeter can be used to check for continuity of the wires to ensure proper connection.
- Slide the cable clamp to meet the female socket. Insert the two face screws to attach the two parts together. Push the extension cable into the rear of the socket just enough so the outer insulation is held under the rear cable clamp. Tighten all screws.
Powering Up
-
Connect the USB adapter into the extension cord socket and connect the battery pack to the USB socket.
(Note: The V50 battery's Always On mode is automatically enabled when a USB cable is connected. If using our legacy V44 or V15, ensure to manually activate the Always On operating mode of the battery pack to prevent the battery from automatically turning off during periods of inactivity in between scheduled triggers). - Program the controller and close the case for a weatherproof seal.
- Connect the male end of the extension cord to a power outlet to maintain or regularly charge the V50 battery pack.
That's it, you now have a permanent power supply for your long term time lapse using a GoPro camera. Make sure to click here for more information on our DryX weatherproof solution, and start your construction time lapse project today!
Need more information? Don't hesitate to get in touch!