How to Download your GoPro Time Lapse Footage with Blink
This guide outlines the options available for downloading footage from the GoPro HERO3+ and HERO4 cameras during a time lapse when using our Blink time lapse controller. If using BlinkX for the HERO5Black and HERO5Session, see our downloading options page for BlinkX.
The following options are available with Blink:
Physically retrieve the SD card
If you have easy access to the GoPro SD card, this is a simple way to retrieve the footage. If the GoPro camera housing is securely mounted, removing and replacing the GoPro camera to retrieve the SD card should not adjust the positioning of the GoPro camera's view which is important if undergoing a long term time lapse. If using one of the CamDo Outdoor Enclosures, the GoPro does not need to be removed from the bracket to access the GoPro's SD card slot.
What is required?
If you have an SD adapter for your MicroSD card, you can insert the MicroSD card into the adapter and insert the adapter into your computer to download the footage.
- Remove the SD card from the GoPro camera.
- Insert the microSD card into the SD card adapter and connect the adapter to your computer.
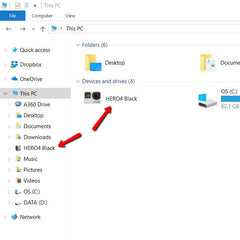
- Open your computer's File Explorer to view your SD card. The SD card should be visible in the left sidebar of the File Explorer.
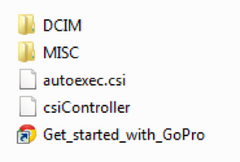
- Clink to view your SD card and Double-click on the DCIM folder to view all footage captured by the GoPro camera. In this folder, you should see a folder named 100GOPRO.
(If you took more than 9999 pictures or videos, you'll see additional folders named 101GOPRO, 102GOPRO, etc. that will each contain the next batch up to 9999 pictures/videos). - Select all files inside the DCIM folder and drag & drop (or cut & paste) the files from your SD card to your computer. Depending on the length of your shoot, you might want to clear your SD card once you have successfully transferred the footage.
- Return the SD card to the GoPro camera.
NOTE: The SD card can be removed and replaced without affecting the Blink's shooting schedule. If the SD card is not inside the camera or is full when a trigger is scheduled, Blink will turn the camera on and off at the programmed interval, but no image will be taken since there is no space for the GoPro camera to save the file.
Leave the GoPro's WiFi Signal Always Active
If the camera is not easily accessible, the GoPro's WiFi signal can remain active throughout the project when using Blink for downloading and clearing the footage from the SD card via the GoPro app. However, it is important to note that keeping the GoPro camera's WiFi always active will consume considerably more power and is better suited for AC powered operation or when only taking a few photos per day with our solar enclosures.
What is required?
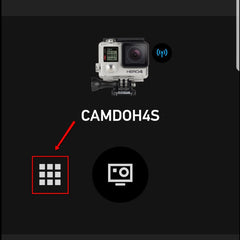
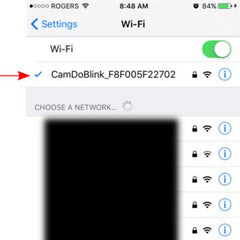
The GoPro's WiFi can be used to download and clear footage from the SD card. Note that you must be within range of the GoPro's WiFi signal to connect to the camera using the GoPro App.
Camera pairing instructions can be found on GoPro's website here.
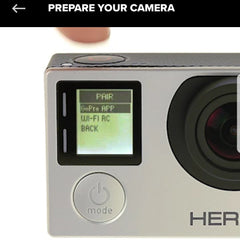
- Turn on the GoPro Camera.
- Cycle through the camera settings by tapping the Mode button until your reach the SETUP menu (gear icon).
- Select the SETUP menu by tapping the Shutter button.
- The WIRELESS menu should be the first option. If not, cycle through the SETUP menu by tapping the Mode button until you reach the WIRELESS menu (WIFI icon).
- Select the WIRELESS menu by tapping the Shutter button.
- Activate the GoPro's WiFi by tapping the Shutter button so that ON is displayed
- If the WiFi menu does not display "MODE: APP", cycle to the MODE setting by tapping the Mode button and select the menu using the Shutter button.
- Cycle through the WiFi MODE settings by tapping the Mode button and select "GoPro App" using the shutter button.
- Turn off the camera by holding the Mode button

Note: some images may not show a thumbnail preview.

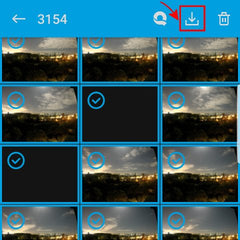

Note: Do not download images during an active time lapse schedule as this will interrupt the time lapse capture process. Download when the schedule is not active.
Schedule an Active WiFi Window
Our HERO4 Pro Firmware can be used with Blink to schedule a set time each day or week for the GoPro's WiFi to turn on for downloading and clearing the SD card using the GoPro App before the camera and WiFi are both turned off to conserve power.
What is required?
The HERO4 Pro CSI Firmware allows for the HERO4 camera to run a script saved to the camera's SD card that can control when the GoPro' WiFi signal is active. Any script saved to the camera's SD card will run each time the camera is turned on. However, the "Active WiFi Window" script begins with a wait period of 1 minute before the command to trigger the GoPro's WiFi. This is to ensure that WiFi is not triggered when Blink is only programmed for time lapse images. Blink's time lapse photo setting has a camera on time of about 15seconds so during regular operation Blink will turn the camera off before WiFi command of the script is triggered.
We have sample scripts for a WiFi period of 10minutes, 30minutes, and 60minutesbefore the camera and WiFi is turned off by the script. The amount of time the GoPro's WiFi remains active can also be adjusted in the script to any length of time.

If you would like to use an Active WiFi Window period not available in the sample scripts, brackets.io is a simple and free text editor that will allow you to edit and save the script using the .csi format.
Camera pairing instructions can be found on GoPro's website here.
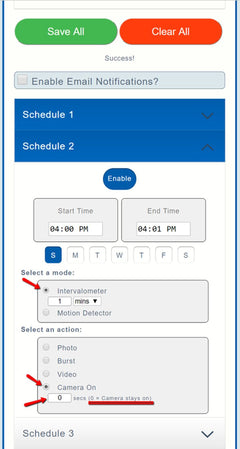
- Tap the days of the week to enable the schedule for that day. Days that are enabled are highlighted in blue indicating they are active.
- Set the desired Start Time for the Download window to start
- Set the End Time for 1 minute after the Start Time.
- Select “Intervalometer” under the “Select a mode” menu. Adjusting the interval is not required since the camera is only triggered once.
- Select "Camera On" under the “Select an action” menu and set the amount of time for 0seconds. The time of "0seconds" indicates that the script will turn the camera off rather than Blink.
- Click the "Enable button" to enable the script schedule. The Enable button and Schedule should be highlighted in blue indicating they are active.
- Click the “Save All” button once all desired schedules have been programmed and enabled.
NOTE: The script schedule should not overlap another schedule to ensure that a conflicting schedule does not end the script before it has completed, resulting in the WiFi remaining active. The script window should be scheduled to start after the daily time lapse schedule has completed, or scheduled to end before the start of the daily time lapse schedule.
Note: some images may not show a thumbnail preview.
The script will turn the GoPro's WiFi on 1 minute after the Blink's programmed start time so that you can connect to the camera using the GoPro App for retrieving the footage. You must be in range of the GoPro camera's WiFi to connect to the camera using the GoPro App.
It is important that the Active WiFi Window schedule should not be set during an active time lapse schedule since Blink will turn the camera off after an image trigger.This would result in the camera turning off with WiFi remaining active since the script has ended before the command to turn off the WiFi signal.
For example, say you want to capture time lapse footage Monday to Friday between 9am and 5pm every day, capturing an image every 15 minutes. The active WiFi window schedule would need to be set outside of these times. An option for the download window could be every day at 5:01pm after the time lapse schedule had finished for the day. The schedules would thus be:
Schedule 1 - Monday to Friday, 9am to 5pm - Mode: Intervalometer every 15minutes - Action: "Photo-Day".
Schedule 2 - Monday to Friday, 5:01pm - 5:02pm - Mode: Intervalometer - Action: "Camera On" for 0seconds (script mode).
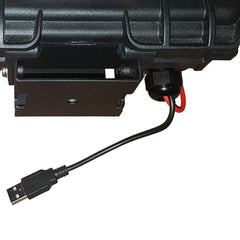
Download via USB cable
If you don't have easy access to the camera eg its high up in one of our outdoor enclosures, a USB cable can be attached to the GoPro's USB port and run down to ground level for downloading the images. If using the USB cable for constant mains power to the GoPro battery, the USB cable can be switched from the USB power adapter to the computer for the download period. Note that if using our external battery packs for power, the HERO4 camera can be powered through Blink's USB port (black color Blink only) to allow for access to the camera's USB port for downloading images.
Note: USB cables have a normal maximum length of about 5 meters (16.4 feet), but you can get longer distances for data transmission by using an Active/Passive USB Repeater Cable. Active USB Repeater Cables are for data only and the GoPro camera should not be powered from a USB cable longer than 5 meters.
What is required?
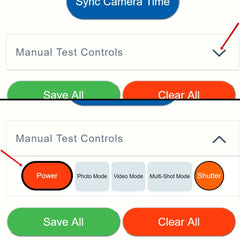
The GoPro camera can be turned on to enter USB mode by either setting a "Camera On" schedule, or by using Blink's "Manual Controls" buttons via Blink's WiFi signal.
For the camera to enter USB mode, the camera must be turned on while connected to a computer. The computer should not remain connected during an active shooting schedule since the camera's shutter cannot be triggered when the GoPro camera is in USB mode.
Blink Scheduled Camera On Window.
Blink firmware v2.01 allows for you to schedule a "Camera On" window that will turn the camera on for a set period of time with no capture/shutter functions. This can be used to schedule a daily or weekly window that the camera can be accessed via a USB cable. This downloading window should be set while Blink has no active shooting schedules since Blink will turn the camera off after a photo or video trigger.
If the AUTO OFF setting is used, it might automatically turn the camera off before you have a chance to access the camera.
- Turn on the GoPro Camera.
- Cycle through the camera settings by tapping the Mode button until your reach the Setup menu (gear icon).
- Select the Setup menu by tapping the Shutter button.
- Cycle through the Setup Menu by tapping the Mode button until you reach the AUTO OFF menu (Off icon).
- Cycle through the AUTO OFF settings by tapping the Shutter button until you NEVER is displayed.
- Exit the Setup menu by pressing the Settings button on the side of the camera

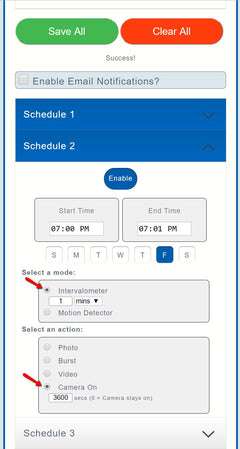
- Tap the days of the week to enable the schedule for that day. Days that are enabled are highlighted in blue indicating they are active.
- Set the desired Start Time for the Download window to start
- Set the End Time for 1 minute after the Start Time.
- Select “Intervalometer” under the “Select a mode” menu. Adjusting the interval is not required since the camera is only triggered once.
- Select "Camera On" under the “Select an action” menu and set the amount of time you would like the download window to remain active.
- click the "Enable button" to enable the download window schedule. The Enable button and Schedule should be highlighted in blue indicating they are active.
- Click the “Save All” button once all desired schedules have been programmed and enabled.

In the DCIM folder, you should see a folder named 100GOPRO that contains the individual images and videos.
If you took more than 9999 pictures or videos, you'll see additional folders named 101GOPRO, 102GOPRO, etc. that will each contain the next batch up to 9999 pictures/videos


It is important that the USB Download Window schedule should not be set during an active time lapse schedule
For example, say you want to capture time lapse footage Monday to Friday between 9am and 5pm every day, capturing an image every 15 minutes. The USB download window (camera on) schedule would need to be set outside of these times. An option for the download window could be every day at 5:01pm after the time lapse schedule had finished for the day. The schedules would thus be:
Schedule 1 - Monday to Friday, 9am to 5pm - Mode: Intervalometer every 15 minutes - Action "Photo-Day".
Schedule 2 - Monday to Friday, 5:01pm - 5:02pm - Mode: Intervalometer - Action: "Camera On" for 1800seconds (half hour).
For the camera to enter USB mode, the camera must be turned on while connected to a computer. The computer should not remain connected during an active shooting schedule since the camera's shutter cannot be triggered when the GoPro camera is in USB mode.
Wired remote trigger for Blink's Manual Controls
Blink's "Manual Controls" buttons can be used to turn on the GoPro camera so that the GoPro can enter USB mode. Blink's WiFi can be activated to access Manual Controls by using a 3second button press from the included wired remote. We offer 2.5mm extension cables at 3ft, 10ft, and 25ft lengths. Both the USB cable and the remote extension cable can be left hanging from the enclosure to be accessed from the ground using the wired remote and computer.


In the DCIM folder, you should see a folder named 100GOPRO that contains the individual images and videos.
If you took more than 9999 pictures or videos, you'll see additional folders named 101GOPRO, 102GOPRO, etc. that will each contain the next batch up to 9999 pictures/videos
Automatic Upload via FTP or WebDAV
The custom HERO4 Cloud CSI Firmware allows for a script on the GoPro's SD card to connect the HERO4 camera to a WiFi network as a "client" to automatically upload images via FTP or WebDAV protocols, rather than the standard GoPro's WiFi "host" mode that can be connected to using GoPro App. The full sized images are saved to the camera's SD card and the Cloud CSI Firmware can automatically upload either the full sized image or a smaller thumbnail image (approximately 1000 pixels wide) for remote viewing and download. The GoPro's WiFi is activated for only the duration of the file transfer before both WiFi and the camera are turned off to conserve power. The web server destination for the uploads is not supplied by CamDo, and you will need to setup your own FTP or WebDAV server for the uploads such as "box.com".
What is required
Only available to select customers. We only recommend the use of this automatic upload feature if you are capable of adjusting a router's WiFi settings without the assistance of CamDo (email sales@cam-do.com for details).
To use the firmware, you need to have an open WiFi network (2.4GHz 802.11n) near the GoPro camera that maintains a stable connection to the internet (some routers, typically 3G & 4G routers, have a power/data saving mode that needs to be disabled) and to manually input the upload directory information (FTP/WebDAV server) as well as the SSID and MAC address of your router to into a script that is saved to the camera's SD card. Information on how to adjust the upload script is available on our website, however, we cannot assist with your router's WiFi settings or power requirements.
Note: Blink and the GoPro cameras do not have as advanced of a WiFi antenna as most smartphones and computers. Your WiFi network hotspot or access point must be within 20 feet of the camera for reliable operation.