CamDo 4G Modem User Manual
CamDo Modem User Manual Index
- Introduction
- What's Included
- LED Status Indicator
- Testing and configuring the modem
- Connecting the modem to UpBlink
- UpBlink Internet Configuration
1. Introduction
This manual describes how to get started with your CamDo modem (SKU: 180337) as part of connecting your UpBlink time lapse controller to the internet for uploads to the CamDo CloudX online timelapse platform.
2. What’s included
With your UpBlink controller, you will have received item E below, a short USB-A extension cable. This needs to be used to connect your modem when using our outdoor enclosure due to the compact size. Not using this cable will place pressure on the modem connection into UpBlink and likely damage it and UpBlink. 
A.UpBlink Controller
B.Micro-USB Power Cable
C.CamDo Custom USB C Cable* (for Sony or GoPro)
*GoPro cable pictured
D.GoPro Attachment Knuckle (optional use)
E.USB-A Extension (for use with weatherproof enclosure)
3. LED Status Indicator
The modem is equipped with an indicator LED which provides the user with a range of feedback. Below is a list of each LED flash type and what they represent. Under normal operation, the following LED colors/patterns apply. The following is a useful reference when first checking if the modem is working. If the modem is flashing green, you should be good to go.

- Green flashing: The modem is successfully connected to the internet and transmitting data.
- Green solid: The modem is successfully connected to the internet and the wifi hotspot function is turned on..
- Blue flashing: The modem is searching for a network/ internet connection.
- Off: The modem is off and/or wifi hotspot functionality is disabled.
4. Testing and configuring the modem
Generally, it is simply a matter of placing a SIM card into your modem and plugging into UpBlink. However, some networks may not automatically configure the modem which requires the user to input the APN settings manually. Please follow the following steps:


Give it a moment for the modem to start searching for the network with the adjusted settings. Watch the LED on the modem as per the colours described in the previous section. When it is flashing green, open up a new tab and confirm you can browse the internet OK.
As a final optional step, you can disable the wifi hotspot on the modem to save power. If you want to turn wifi back on, you can reset your modem by holding down the reset button OR plug the modem into your computer and loading up myufi.com in your browser, and re-enabling.

For the full modem manual, click here.
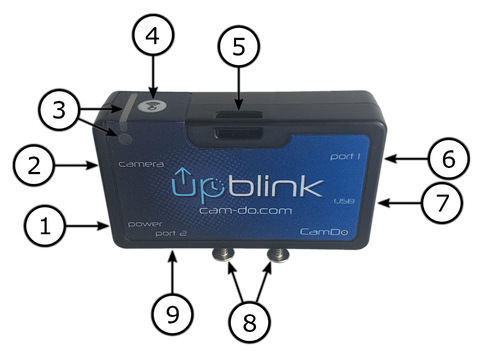
5. Connecting the modem to UpBlink
6. UpBlink Internet Configuration
See the UpBlink user manual for instructions on how to access the UpBlink configuation page, to setup your internet connection.
The information used by UpBlink to connect to the internet is entered within the "Upload Schedule" drawer. The Upload Schedule is valid and enabled when the drawer is highlighted blue and icon displays a checkmark within a cloud symbol. Ensure you select the "Internet connection" type in the dropdown menu as "Ethernet" for the CamDo modem to work most efficiently.

Once your connection information has been entered, it is recommended to use the "Test Connection" button above the "Upload Schedule" to confirm your UpBlink can connect to the internet using the information provided and that you are running the most recent UpBlink firmware available. The internet connection should be tested at the deployment site to confirm internet access is available at the desired location.

If the test connection was successful, UpBlink will display if the firmware is upto date or download the latest firmware if a newer version is available.
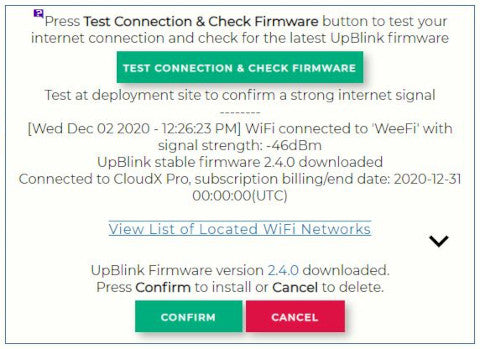
If the internet connection was unsuccessful, UpBlink will display the error message.

As a reminder, below is a full setup video for UpBlink with our outdoor enclosures and GoPro camera. You can also view other helpful instructional videos in the “Support” section.
How to set-up your UpBlink controller with a GoPro