Time Lapse Intervalometer User Manual
TL-004 Time Lapse Intervalometer for HD HERO, HERO2, HERO3 White , Black and HERO3+, and HERO4 Cameras.

Each section is labeled with the correct switch setting required to configure your Intervalometer. Please see the section for your camera.
This manual is for the TL-004 and TL-003 Time Lapse Intervalometer sold after March 17, 2013. If you have an older version of the Intervalometer, please consult an earlier version of the manual as many functions have changed.
If you already own one of our previous Intervalometer it is important to note that operation for the HERO3 Black, HERO3+, or HERO4 is different from the previous products and that the DIP switch settings have also changed.
Camera Compatibility
|
Camera |
Compatibility ( Y / N ) |
|
HERO4 Black |
✔* |
|
HERO4 Silver |
✔* |
|
HERO (2014) |
✘ |
|
HERO3+ Black |
✔ |
|
HERO3+ Silver |
✔ |
|
HERO3 Black |
✔ |
|
HERO3 Silver |
✘ |
|
HERO3 White |
✔ |
|
HERO2 |
✔ |
|
HERO |
✔ |
* NOTE: HERO4 compatibility can only be achieved through a custom firmware modification to the camera. The firmware modification is explained in detailhere.
The Time Lapse Intervalometer is used to take time lapse photographs and control the times when the camera turns on. The negligible amount of power required is provided by the camera battery.
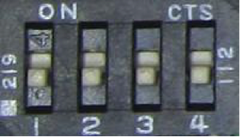
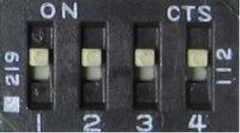
Setting the Camera Type
Each time the scheduler is plugged in with the dipswitches set to0011 the configuration will toggle between One Button Mode (HERO, HERO2, HERO3 White) and Script (HERO3 Black, HERO3+, HERO4) operation.
By default, the scheduler is configured for the use of scripts (HERO4, HERO3+, HERO3 Black). The Scheduler will turn the camera on, and the scripts will be used to turn the camera off.
If you are using a HERO, HERO2, or HERO3 White camera, the GoPro will be turned on and off by the Scheduler and will function using One Button Mode rather than requiring scripts to be saved the the SD card.
To change camera types, set the dipswitches to 0011 and plug the Intervalometer into the back of the camera. The LED on the scheduler will flash twice to indicate that it is now configured to operate using One Button Mode
To change the configuration to Script operation, set the switches to0011 and plug the Intervalometer into the back of the camera. The LED will flash 3 times to indicate it is now configured to operate with the use of scripts.
Setting GoPro Recording Mode
HD HERO. To use One Button Mode on theHD HERO, scroll through the settings and changeOnF (the default) toOnO. Next, choose the default operating mode at power up, chooseF for video (film),P for single shot,3 for triple shot, orPES for sequential shots every few seconds. Skip several settings and choose from P1, P2, P5, P30 or P60 for one photo every 1,2,5,30 or 60 seconds while the camera is on.
HERO2. To use One Button Mode on theGoPro HERO2, scroll through the settings and changeOne Button Mode toOn and press the shutter button to confirm. Next, choose the default operating mode at power up, chooseVideo for video,Photo for single shot,Burst for triple shot, orTime Lapse for sequential shots every few seconds. Skip several settings and choose from theTime Lapse Modesfor 0.5, 1,2,5,30 or 60 seconds while the camera is on.
HERO3 White. To use One Button Mode on theGoPro HERO3 White, the WiFi must be disabled. Until GoPro releases a firmware updated, WiFi and One Button Mode cannot be used at the same time. The menu settings are the same as the HERO2, above.
HERO3 Black/HERO3+. One Button Mode should be turned off and the camera is operated by theSuper One Button Mode scripts which control the camera actions and the time the camera is turned off. The script can turn WiFi on, if needed.
HERO4. One Button Mode should be turned off and the camera is operated by theCSI HERO4 Scripts which control the camera actions and the time the camera is turned off. The script can turn WiFi on, if needed.
There are numerous videos on YouTube showing how to set up and use One Button Mode for each camera.
Changing the Shoot Time and Repeat Cycle Time.
To adjust the Intervalometer interval cycle time,set the dip switches to0000 (0100 or 0101 for longer times) and plug the Intervalometer into the camera. There should be anSD card in the camera.It is less confusing if the SD card does not have a script installed which will start pressing buttons and doing things automatically while you are programming the card.
The LED on the Intervalometer board will flash rapidly for 15 seconds to indicate that commands can be entered using the button on the board. If you do nothing, the Intervalometer program will be unchanged.
If you press the button, the Intervalometer will take commands depending on the settings of the 4 dip switches on the back of the Intervalometer board. Do not hold the button in. Press it briefly but firmly (about a quarter second). Watch the green LED on the Intervalometer board, ignore the camera LEDs and LCD display while programming the Intervalometer board.
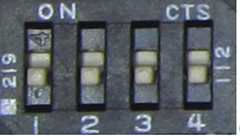 1. 0000. Program a new time lapse cycle for theHERO3 Black/HERO3+/HERO4.
Thecycle time is the repeat interval at which the camera is started.
- Set the dipswitches to0000 - (use0101 or0100 for longerwait times)
- Turn on the camera.
- Plug the Intervalometer into the back of the camera. The green LED on the Intervalometer board will flash rapidly. You have 15 seconds to start programming. If you take too long, you will have to unplug the board from the camera and start over. Watch the green LED. Ignore the LCD on the camera.
- Cycle Time: Press the button to begin programming. The green LED will flash once per second for the new interval time. When you have waited the desired time...
- Press the button again to end the cycle. The green LED will then light continuously for several seconds to indicate the end of the programming.
- Unplug the Intervalometer andset the dip switches to the desired operating mode.Use 1111 to run the time lapse cycle using the new settings.
-
 0000. Program a new time lapse cycle for the HERO3 White / HERO2. For the HERO2 and HERO3 White camera, it will be necessary to program the shoot time as well as the cycle time.

The shoot time is the time the camera stays on during each cycle.
The cycle time is the repeat interval from the beginning of one shoot to the beginning of the next.
- Set the DIP switches to 0000 - (use 0101 or 0100 for longer interval cycle times. The shoot timeis not affected by the 0101 or 0100 multiplier)
- Turn on the camera.
- Plug the Intervalometer into the back of the camera. The green LED on the Intervalometer board will flash rapidly. You have 15 seconds to start programming. If you take too long, you will have to unplug the board from the camera and start over. Watch the green LED. Ignore the LCD on the camera.
- Shoot Time: Press the button to begin programming. The green LED will flash long flashes once per second for the new shoot time. When you have waited the desired shoot time...
- Cycle Time: Press the button to begin programming. The green LED will flash short flashes once per second for the new interval time. When you have waited the desired time...
- Press the button again to end the cycle. The green LED will then light continuously for several seconds to indicate the end of the programming.
- Unplug the Intervalometer and set the dip switches to the desired operating mode.Use 1111 to run the time lapse cycle using the new settings.
To program longer intervals, there is a short cut:
- 0101. Use this setting instead of 0000 to record an interval cycle time multiplied by 60. When the camera is running, the repeat cycle time will be 60 times the setting recorded using the method above. Each LED flash in the programming time will set 1 minute of interval cycle time.
- 0100. Use this setting instead of 0000 to record an interval cycle time multiplied by 600. When the camera is running, the delay time between shots will be 600 times the setting recorded using the method above. Each second of the programming time will set 10 minutes of interval cycle time. Recording 6 flashes of the LED will be played back as one shot, once an hour.
The shoot time you program for a HERO2 or HERO3 White will not be multiplied by the dipswitch setting and each flash will always program for 1 second of shoot time.
This can be a little difficult to understand at first. The video below shows how to program a single shot once every 15 minutes using the 0101 mode to program the 15 minute wait time in 15 seconds.
Time Lapse Operation
- 1111. When you receive the Intervalometer it will be pre-programmed for one photo every 60 seconds.
- Set the GoPro recording Mode:
- HERO2: Use the menus to set up One Button Mode P60 (Time Lapse 60 seconds) on the camera.
- HERO3 Black or HERO3+: Install the SOBM script on an SD card and insert it in the camera.
- HERO4: Install the CSI script on an SD card and insert it in the camers.
- Turn the camera OFF.
- Set the dip switches on the controller to 1111 - all 4 switches ON.
- Insert the controller in the HERO Port on the back of the camera. If the camera comes on when you insert the controller, do not turn the HERO3 White or HERO2 off manually. Allow the controller to take control and turn off the camera. If your camera is running a long SOBM or CSI script, turn off the camera manually using the POWER/MODE button.
The interval cycle can be custom programmed using the 0000, 0101, or 0100 setting.
Delayed Start Timing
- 1000. Delayed Start. Using 1000 dipswitch setting will run the Intervalometer in the delayed start, one cycle, no repeat option. The interval cycle will not repeat. The camera will turn on after the programmed interval time, capture one sequence, and turn off after the end of the programmed shoot time (HERO, HERO2, HERO3 White) or at the end of the SOBM script (HERO3 Black, HERO3+), or CSI script (HERO4) .
If the camera comes on when the board is inserted, use the POWER/MODE button on the camera to turn it off immediately.
Automatic Start
- 1001. Automatic Start is designed to turn the camera on 5 seconds after the Intervalometer board is started. That is, 5 seconds after the Intervalometer board first receives power. This is very useful for turning on the camera when it is in a remote location that is not easily accessible. With the HERO3 White, HERO3 Black and HERO3+ cameras, aBattery Eliminator can replace the GoPro battery to power the camera directly from an external power source. All that is necessary is to apply power to theBattery Eliminator with the Intervalometer plugged in using the 1001 setting, and 5 seconds later, the camera will turn itself on. When the camera turns on, One Button Mode can be used to record video or take pictures until power is removed. With the HERO3 Black and HERO3+, aSOBM script can be executed to turn on WiFi or begin taking photos or shooting video. A set recording time can be programmed into the script before turning the camera off or the camera can be turned off via WiFi control. After the camera has turned off, power can be removed without the risk of corrupting the files.
Another advantage of being able to do this when the camera is not easily accessible is that if the camera freezes for some reason, you can effectively remove the battery and reset the camera.
NOTE: This feature is not available on the HERO4
Factory Reset
1010- Turn on the camera.
- Plug in the Intervalometer card. After a 1 second delay, the green LED will go solid for 10 seconds.
- After the LED has stopped, unplug the card from the camera.
- The Intervalometer will now be set to the default 1 minute interval cycle time with a 5 second shoot time.
The 1010 reset does not change the camera selection. It will not be necessary to select the camera type after a reset.
Light Triggered Operations
The Intervalometer board has a light sensor which can be used to shoot time lapse when a light shines on the LED on the Intervalometer.
0111. This setting is used to take time lapse shots only when there is light falling on the back of the Intervalometer board. To set the light sensitivity threshold, set the switches to0111 and insert the board into the camera connector. The green LED will flash. Press the button to indicate you wish to change the light sensitivity setting. With the camera in the minimum light desired for shooting, press the button again. The setting will be saved. The LED will now indicate the setting. It will be off if there is insufficient light and on if there is enough light.
Remove the Intervalometer from the camera. Insert it again. The LED will flash for 15 seconds. Do not press the button on the Intervalometer. The LED will stop flashing and now the Intervalometer is set up to turn the camera on, shooting the programmed time lapse sequence only if there is more light than the threshold value.
If the time has passed a full cycle, and light strikes the Intervalometer sensor, the Intervalometer will immediately wake up and turn on the camera. This makes the camera instantly sensitive to light.
For example, if left in the refrigerator or a cupboard, it will start immediately if the door is opened. If the camera is placed in front of a motion activated security light, or a manually controlled light in a dark place, the camera will be turned on when the light comes on. A green laser pointer could even be used to trigger the camera remotely. The sequence resets in the programmed cycle time.
One of our customers uses the light trigger underwater to start the camera with his flashlight without pressing any buttons on the case.
NOTE: The light trigger is a useful option, but it has limitations. The threshold setting is sensitive to temperature and battery level. Light levels are not easy to judge in the real world. In many situations, it is not as accurate as one would like. Because of this, it is not recommended that the sensor be used to save memory by not shooting photos in low light. It is better to take extra photos and discard the bad ones than to lose an important photo that occurred at the margin of the sensor's threshold.
External Trigger
The CamDo naked PCB Intervalometer board includes an opto-isolated external input for triggering the camera from external sources such as an interval timer, various types of motion detectors, magnetic reed switches, thermostats, radio control, computer control, phones, tablets, Android devices, arduinos, and more. More information on how to connect and use the external trigger is presented in the Application Notes for Advanced Users.
The trigger can also be configured as an enable signal for time lapse photography, allowing the use of a simple timer with an AC adapter to be used to set up complicated sequences such as shooting 9am to 5pm on weekdays. The Programmable Scheduler uses this trigger to schedule up to 17 events.
Use of the external trigger requires some knowledge of electronics as it is necessary to solder wires to the PCB.
Our Motion Detectorproducts use a PIR sensor or an X-Band radar detector to trigger the camera when motion is sensed in front of the camera.
Optional External Power for Prolonged Operation
For time lapse photography extending over several months, or when recording long video clips on each shoot interval you may wish to power the camera from a USB charger or Battery Eliminator for longer battery life.
The power supply to the camera must never exceed 5.5 volts. The power supply should be rated at a minimum of 1 amp (1000 mA). More details are shown in the Application Notes. Chargers that are rated for charging an iPad are usually good for the GoPro camera. Some GoPro cameras will flash the charging light if they detect a charger which is not providing the correct voltage.
5V DC power can be applied directly to the +5 and GND connections on the Intervalometer PC board, which allows you to run the cable from the back of the camera and use the normal GoPro housing with the LCD skeleton bacpac. The controller board circuit contains a diode that causes a small voltage drop that prevents the HERO4 from charging the battery. The battery must remain inside the GoPro camera.
HERO2 You can use the normal mini-USB charging jack on the side of the camera. The HERO3 Battery Eliminator cannot be used with the HERO2 since the positive and negative power terminals are reversed.
The HERO3 and HERO3+ can be powered by the mini-USB connector on the side of the camera, however, the camera becomes unstable when operating while charging the battery. If you are using a HERO3 or HERO3+ camera with external power, we strongly recommend using a H3 Battery Eliminator. The coupler style Battery Eliminator replaces the GoPro battery to bypass a problem that some users have had with the GoPro charging logic causing the camera to freeze and require a reset. The H3 Battery Eliminator allows a DC input voltage from 5-24V. While the AC Battery Eliminator allows for AC voltage from 120-240VAC
The HERO4 can be powered by the mini-USB connector on the side of the camera. The HERO4 Battery Eliminator cannot be used with the Intervalometer since they use the same port.
Notes
Timing is approximate because the camera startup time varies from shot to shot. In addition, the Intervalometer clock timing will vary slightly with camera battery voltage and the ambient temperature.
Please suggest new features and tell us about anything you find difficult to follow in the instructions so we can improve the manual for future users.
|
DIP |
Function |
|
1111 |
Normal time lapse using the programmed interval. |
|
1000 |
Delayed start of length WAIT time. Single cycle of SHOOT time. |
|
1001 |
Automatic start 5 seconds after power is applied. |
|
0000 |
Program a time lapse interval. |
|
0101 |
Program a new time lapse interval x60. |
|
0100 |
Program a new time lapse interval x600. |
|
1010 |
Reset all user programmable settings (insert with camera on). |
|
|
|
|
0011 |
Camera Selection. Choose HERO2 or HERO3 Black operation mode. |
|
0110 |
Turn camera on when external input is triggered. |
|
0001 |
Turn camera on when external input is triggered multiple times. |
|
1110 |
Shoot time lapse when external input (enable signal) is triggered. |
|
1100 |
Shoot time lapse and respond to external input. |
|
1101 |
Shoot time lapse and respond to external input when light. |
|
0111 |
Shoot time lapse only when there is light on the sensor. |
|
0010 |
Test external input by lighting LED when input is triggered. |
|
1011 |
Frequently Asked Questions
Does the Intervalometer board fit inside a waterproof case?
The Intervalometer does not fit in the housing shipped with the camera. It fits inside any of the extended back doors in the GoPro Backdoor kit (3m Touch, 40m Standard) that clip into the standard GoPro housing, or the Extended GoPro Dive Housing (60m) that are designed for use with the GoPro BacPac accessories. The Intervalometer also fits our Deepwater Housing (1500m) for use in extreme depths or harsh environments.
Does the Intervalometer work with your battery eliminators?
Yes, we recommend using the Intervalometer with a HERO3/3+ Battery Eliminator. There is a slot in the back of the Intervalometer for the Battery Eliminator cable to pass through.
Using the Battery Eliminator reduces heat from the camera battery and charging circuit. A HERO3/3+ Battery Eliminator also bypasses a problem with the GoPro charging logic due to operating the camera while charging the battery from the camera’s USB port that causes the camera to freeze and require a reset.
The Intervalometer uses the same port as the HERO4 Battery Eliminator so the 2 products cannot be used together. However, the HERO4 is much more reliable when being operated while it is changing and can be powered using the camera's mini-USB port.
I want to shoot a 4 minute video of a 4 month construction job. How do I do that?
You want each month to be one minute of video. That is about 2 seconds per day, or 60 frames at 30fps. Shooting 24 hours a day, that is one shot every 24 minutes, or about one shot every 10 minutes if you only care about the daytime (acquiring shots for daytime only can be done using ourProgrammable Scheduler or by removing nighttime shots during post-production). Program the Intervalometer for one shot every 10 minutes. At 144 shots per day, the internal battery will last several days. A 32GB SD card will hold 5-10,000 shots, depending on the complexity of the picture, and the resolution selected. You can put 35-70 days on each card. Our Time Lapse Calculatorcan be used as a guide to how long the SD card and battery will theoretically last using different shooting schedules.
So much for theory. In practice, things go wrong. The camera can stop working. The battery might not have been fully charged. The SD card may have a flaw. A bird dropping might block the lens. We never recommend leaving the camera unchecked for more than a few days. Always assume that what can go wrong, will go wrong.
I set the camera up to shoot one picture every minute for a week. It worked perfectly for 4 days, but after that I didn't get any pictures. What am I doing wrong?
First, make sure you are using the latest firmware in the camera. Some HERO3 cameras were shipped with a version of firmware that ate batteries in as little as 4 hours. This was fixed by GoPro.
We have found that the most common compatibility problems are due to the type of SD card being used. You are strongly advised to use an SD card from the recommended list on GoPro's website. Use of cards not on the list, especially SanDisk Ultra cards, will greatly increase your chance of trouble with your setup. Some SD cards have the same product name as the ones on the list and only have a U1 rating. Make sure the SD card has a class 10 and U3 rating. Underperforming SD cards can prevent proper functioning of your GoPro camera's features.
HERO3 Black, HERO3+, HERO4: The reason the script operation has problems with slower SD cards appears to be in the timing of the boot sequence when the camera starts up. In some cases, the card is not ready to communicate with the camera at the time the camera looks for the script. As a result, the camera crashes and drains the battery or the script is not seen and the camera continues its boot sequence as if no script was present.
HERO, HERO2, HERO3 White: If running out of power was not the issue, the problem is likely to be that as the SD card filled up, the camera took longer to come on in one button mode, take a shot and store it to the SD card. Make sure your shoot timeis long enough for the worst case. The camera also takes longer to shoot and store an image when the light is low, which is another reason images might not be captured.
It is necessary to experiment with the camera and SD card you are using. We have discovered from our customer feedback that there is a considerable difference from one camera to the next, so there is no single "right answer" to the optimum settings. In one case, a customer had six identical cameras with identical SD cards, yet one of the cameras was slower to respond than the other five.
I set the camera to take one photo, but it is taking 2 every time.
In One Button Mode, there is no single photo mode. Please read the GoPro manual. When set for one photo in One Button Mode, the camera will use the Time Lapse mode of the camera to take multiple photos. Set the repeat interval cycle time on the camera to longer than the shoot time of the Intervalometer to take one photo each cycle.
The Intervalometer is turning on the camera but not turning it off. Why?
This probably means you are using a HERO2 or HERO3 White camera but have not changed the camera mode from script operating mode (HERO3 Black, HERO3+, HERO4) which is the default.
If you are using a HERO3 Black or HERO3+, it probably means you haven't installed the Super One Button Mode script that takes a photo or video before turning off the camera.
If you are using a HERO4 it probably means you haven't installed the HERO4 CSI script that takes a photo or video before turning off the camera.
I'm still having problems. Why?
The FAQ and Troubleshooting Guide has a lot more tips about sources of problems and how to correct them.
I know how to write code for the MSP430 processor. Can I reprogram the chip with my own firmware?
Yes. The SBW interface is brought to the edge of the board, so you can use the Texas Instruments LaunchPad ($4.30) to program the device. There is a tutorial: Use your launchpad as a programmer. Let us know if you come up with something really brilliant!
The PCB version of the Time Lapse Intervalometer is a naked circuit board. As such, it is vulnerable to static electricity. Always discharge yourself to a metal object before touching the board. Always handle the board with care and by grasping the edges. Avoid touching the copper pads or the devices on the board.
WARRANTY: For a period of up to 90 days from the date of purchase, CamDo agrees to replace the product in the event of failure due to defects in materials or workmanship. This warranty does not cover malfunctions caused by misuse or force majeure.