Programmable Scheduler User Manual

This manual is for the CamDoPS-004 and PS-003 Programmable Scheduler sold after March 15, 2013 for the HD HERO, HERO2, HERO3 Black and White, HERO3+ and HERO4 cameras. If you have an older version of the Scheduler, please consult anearlier version of the manualas many functions have changed.(PS-003 does not work with the HERO4 camera).
Compatibility
|
Camera |
Compatibility ( Y / N ) |
|
HERO4 Black |
✔* |
|
HERO4 Silver |
✔* |
|
HERO (2014) |
✘ |
|
HERO3+ Black |
✔ |
|
HERO3+ Silver |
✔ |
|
HERO3 Black |
✔ |
|
HERO3 Silver |
✘ |
|
HERO3 White |
✔ |
|
HERO2 |
✔ |
|
HERO |
✔ |
* NOTE: HERO4 compatibility can only be achieved through a custom firmware modification to the camera. The firmware modification is explained in detailhere.
TheProgrammable Scheduler controller is used to schedule filming or time lapse photography using a programmable clock timer with up to 17 on and off times.
No batteries are required for the CamDo timer. The timer is designed for very low power operation, stealing a tiny amount of power from the GoPro battery. When first plugged into the camera, the timer will require 30 seconds or so to charge up its internal capacitor. Wait for the LCD to become dark and easily readable before proceeding. The clock will retain its time and programs for up to a minute when unplugged from the camera. If the Programmable Scheduler loses power (LCD display goes blank and clock resets), the interval cycle time will be retained but you will need to reprogram the time of day and shooting schedule.
Quick Start/Troubleshooting
It will be easier to follow the instructions in this manual if you understand the basic concept of how the functions are divided. There are three groups of settings to be concerned with. The LCD Scheduler sets the schedule for the intervalometer. The intervalometer controls when the camera is on. The camera One Button Mode settings or script saved to the SD card determine what happens when the camera is on.
Set up the operation in reverse order. Program the camera, then the intervalometer, and finally the shooting schedule.
First, the camera must be set to the required mode for photos or video. For HERO, HERO2, and HERO3 White cameras, it is necessary to useOne Button Mode on the camera to take a photo when the camera is turned on. For HERO3 Black, HERO3+ and HERO4 cameras, it is necessary toinstall a script on the SD card which will tell the camera what actions to perform when it is turned on.
You are strongly advised to use an SD card from the recommended list on GoPro's website. Underperforming SD cards can prevent proper functioning of your GoPro camera's features. Make sure the SD card has a class 10 and U3 rating.
Set up the actions you require (One Button Mode orscript install) andtest the camera without plugging in the Scheduler to make sure it will do what you expect it to do. Use the MODE/POWER button on the camera to turn it on and watch what it does.
Second, the intervalometer needs to be set up. Start bysetting the camera type for One Button Mode or Script operation using the (1011) dipswitch setting .
Set up the intervalometer to operate the camera. You can choose to have the camera turn on and stay on, or you can set up a time lapse sequence. The default time lapse sequence is one shot a minute.
Test that the intervalometer operates the camera as you expect. Start with the default interval of one shot a minute, and watch it work for a few minutes. If the dip switches are set to1111, the intervalometer will operate the camera in time lapse mode without checking the Scheduler. In other words, the intervalometer will work as if the LCD Scheduler is always on and continue the programmed interval cycle time on a 24 hour shooting schedule.
The intervalo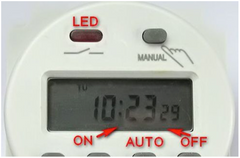 meter settings are stored in flash memory. They will be retained until you change them or perform the reset operation.
Finally, the LCD scheduler can be used to turn the intervalometer on and off according a programmed schedule.
First,test the operation using the MANUAL button to turn the Scheduler on and off. Set the dip switches to0110. When the LCD scheduler is on, the camera will be on. If the script turns the camera off, the Scheduler will turn the camera on again. When the LCD scheduler is off, the camera will turn off after the programmed shoot time (default 5 second) or at the end of the script. Press the MANUAL button to cycle through the ON - AUTO - OFF - AUTO - ON sequence, watching the LCD display and observing that the camera goes on and off.
Now you are ready toprogram the schedulerto turn the camera on and off at the desired times.
The LCD scheduler requires power to retain its settings. It will retain them for 30 seconds if you need to change the dip switch settings or change the battery in the camera. If the LCD scheduler loses its settings, it will need to be reprogrammed. It will not be necessary to reprogram the intervalometer settings (time lapse interval) as these are retained in memory.
Setting the Camera Type
Each time the Scheduler is plugged in with the dipswitches set to1011 the configuration will toggle between One Button Mode operation (HERO, HERO2, HERO3 White) and Script operation (HERO3 Black, HERO3+, HERO4).
By default, the Scheduler is configured for the use of scripts (HERO4, HERO3+, HERO3 Black). The Scheduler will turn the camera on, and the scripts will be used to turn the camera off.
If you are using a HERO, HERO2, or HERO3 White camera, the GoPro will be turned on and off by the Scheduler and will function using One Button Mode rather than requiring scripts to be saved to the SD card.
To change camera types, set the dipswitches to1011 and plug the Scheduler into the back of the camera. The red LED on the Scheduler will flash twice to indicate that it is now configured to operate using One button Mode.
To change the configuration to Script operation, set the switches to1011 and plug the Scheduler into the back of the camera. The LED will flash 3 times to indicate it is now configured to operate with the use of scripts.
The Programmable Scheduler turns the camera on according to the timer schedule. It does not operate the shutter of the camera. The camera shutter and modes are changed in the camera settings.
The Script operation is controlled by a programmed script on the SD card which can tell the camera to take a photo, shoot a video, turn on WiFi, and turn the camera off again. The scripts for the HERO3 Black and HERO3+ are available for download on theSuper One Button Mode Page. The scripts for the HERO4 can be found on theHERO4 csi firmware page.
For the One Button Mode (HERO, HERO2 and HERO3 White) operation, the operation of the camera when it is turned on is controlled by the GoPro One Button Mode settings. In One Button Mode, turning the camera on causes the camera to immediately begin taking photos or recording video without pressing the shutter. The Scheduler will turn the camera on and off.
|
Setting GoPro Recording Mode |
|
HERO1. To use One Button Mode on theHD Hero, scroll through the settings and changeOnF (the default) toOnO. Next, choose the default operating mode at power up, chooseF for video (film),P for single shot,3 for triple shot, orPES for sequential shots every few seconds. Skip several settings and choose from P1, P2, P5, P30 or P60 for one photo every 1,2,5,30 or 60 seconds while the camera is on. HERO2. To use One Button Mode on theGoPro HERO2, scroll through the settings and changeOne Button Mode toOn and press the shutter button to confirm. Next, choose the default operating mode at power up, chooseVideo for video,Photo for single shot,Burst for triple shot, orTime Lapse for sequential shots every few seconds. Skip several settings and choose from theTime Lapse Modesfor 0.5, 1,2,5,30 or 60 seconds while the camera is on. HERO3 White. To use One Button Mode on theGoPro HERO3 White, the WiFi must be disabled. WiFi and One Button Mode cannot be used at the same time. The menu settings are the same as the HERO2, above. HERO3 Black/HERO3+. One Button Mode should be turned off and the camera is operated by theSuper One Button Mode scripts which control the camera actions and the time the camera is turned off. The script can turn WiFi on, if needed. HERO4. One Button Mode should be turned off and the camera is operated by the CSI HERO4 Scripts which control the camera actions and the time the camera is turned off. The script can turn WiFi on, if needed. There are numerous videos on YouTube showing how to setup and use One Button Mode for each camera. |
Changing the Time Lapse Shoot Time and Repeat Cycle Time.
Product Update:If your controller was shipped before November 6, 2012, you will use the PWR/MODE button on the camera to program the time lapse interval. Please refer to theUser Manual for PS-001.
To change the time lapse shoot and cycle times,set the dip switches to0000 (0100 or 0101 for longer times),turn the camera on, (set automatic turn off to NEVER), then plug the controller into the camera.
The LED on the Scheduler will flash rapidly for 15 seconds to indicate that commands can be entered using the MANUAL button on the timer. If you do nothing during this time, the controller program will be unchanged.
If you press theMANUAL button, the controller will take commands depending on the settings of the 4 dip switches on the back of the controller. Do not hold the MANUAL button in. Press it briefly but firmly. Watch the red LED on the timer, ignore the camera LEDs and camera LCD display while programming the controller. Every step requiresTWO short presses of the MANUAL button.
Unlike the time of day and shooting schedule, the time lapse programming will be retained by the controller without power. To reset the programming, use the1010 Reset method to erase all user programming of the time lapse controller.
0000. Program a new time lapse cycle.
A cycle consists of ashoot time and await cycle time. During the shoot time, the camera is on. During the wait cycle time, the camera is off.
- First, plug the timer into the camera for a minute to charge the timer until the LCD display is clearly readable.Press the MANUAL button until the OFF icon is showing on the LCD. Unplug the timer.
- Set the dipswitches to0000 - (use0101 or0100 for longerwait cycle times. Theshoot timeis not affected by the 0101 or 0100 multiplier)
- If you are using the One Button Mode operation of the Scheduler, make sure to turn on the camera.
- Plug the controller into the back of the camera. The LED on the Scheduler will flash rapidly. Watch the red LED on the timer. Ignore the LEDs and LCD on the camera.
- Shoot Time: For the script operation of the Scheduler (HERO3 Black, HERO3+ and HERO4), the shoot time is determined by the script saved to the SD card. Skip to step 7 to schedule the wait cycle time.
- For the One Button Mode operation, press the MANUAL buttontwice (icons show AUTO, then ON) to begin programming theshoot time, the length of time the camera is on for photos or video clip shooting. The LED will flash long flashes once per second. Wait for the length of time you want the camera to be on (count the flashes or watch the timer to determine the time). The minimum shoot time is 5 seconds. There is no maximum. For capturing time lapse images, we suggest using at least a 10 second on time to ensure the camera has enough time to save the image before it is turned off.
- Wait Cycle Time: Press the MANUAL buttontwice to indicate the recording of a new wait cycle time. The LED will flash off once per second representing the length of the repeat cycle. When you have waited the desired time...
- Press the MANUAL buttontwice to end the cycle. After a brief pause, the LED will come on continuously for 7 seconds to indicate the program has been saved to non-volatile memory.
- Unplug the controller andreset the dip switches to 1111 to run the time lapse cycle using the new settings. Use1110 if you want to run time lapse at times determined by the LCD timer.DO NOT FORGET TO DO RESET THE DIP SWITCHES
To program longer wait cycle times, there is a short cut:
- 0101. Use this setting instead of 0000 to record a cycle time multiplied by60. When the camera is running, the wait time between shots will be 60 times the setting recorded using the method above. For each LED flash, the delay will be 60 seconds. Theshoot time is not changed, but recorded as above. Only the wait cycle time is changed.
- 0100. Use this setting instead of 0000 to record a cycle time multiplied by600. When the camera is running, the delay time between shots will be 600 times the setting recorded using the method above. For each second, the delay will be 10 minutes.
Programming the Scheduler
Set the dipswitches to 1110to run time lapse at times determined by the LCD timer.
Make sure the Scheduler timer is set toAUTOor the program will not be executed.
Setting the time. While holding down the clock button, press the D+, H+ and M+ buttons to set the day of the week, hour and minute. The time is in 24 hour format.
Program Schedule. The timer has 17 separate programs which can be accessed by pressing theP button. The first press will clear the display and show program 1. The ON time is programmed first. PressP again to program the OFF time for each program numbered 1 through 17.
PressD+ to set the desired days for the program to operate. One press selects all the days of the week, followed by Monday - Saturday, Monday - Friday, Saturday - Sunday, Monday - Wednesday - Friday, Tuesday - Thursday - Saturday, Monday - Tuesday - Wednesday, Thursday - Friday - Saturday, and then the individual days. Stop pressing the D+ button when you see the selection you want to use.
Press theH+ andM+ buttons as many times as necessary to set the desired hour and minute to start the camera. The time is in 24 hour format.
Press theP button again and set the turn off time for program 1 in the same way.
If you only need one program, press theClock icon button to return to the clock display.
If you wish to create a more complicated program, continue pressing theP button to access program 2 through 17. You can review and edit the programs individually at any time.
When done, press theMANUAL button and watch the icons at the bottom of the LCD display. The ON icon is in the middle and the OFF icon is at the bottom right. Be sure to leave the timer set toAUTO or the program will not be executed. Double check that thetimer is set toAUTO as this is easy to forget. The writer speaks from experience.
If you need to unplug the controller from the camera, the internal capacitor will retain the programs and the correct time for about a minute.
Tip: You do not need to set the time if you only want to start the camera after a simple delay, say 3 hours. Just let the timer start from 00:00 and program a start time, such as 03:00.
Reset to Factory Defaults
1010. Reset the time lapsefactory defaults. Normally, the factory default for time lapse is one 5 second photo every minute.
- Set the switches to 1010.
- Turn on the camera.
- Plug the timer into the camera.
- The LED will be solid on for seven seconds to indicate that all settings have been cleared.
- Unplug the card from the camera and reset the switches to 1110 or 1111 for normal operation.
The factory reset does not change thecamera type setting.
Testing the Timer Control
- 0010. If the switches are set to off-off-on-off, the controller will enter a test mode. The LED on the Scheduler will come on when the timer is on. Pressing the MANUAL button on the timer cycles through the sequence ON - AUTO - OFF - AUTO - ON. Note that it always takes 2 presses of the MANUAL button to turn the timer on or off manually.
The HD HERO must be ON to use this test. With other GoPro camera models it doesn't matter if the camera is on or off.
Scheduled Shoot
0110. Scheduled shoot can be used with any of the video modes on the GoPro camera to record a video once at specific time and day up to a week from the programming time, or at a certain time every day, or the timer can be programmed for up to 17 different events over the course of a week.
Set the switches on the back of the controller card to0110off-on-on-off to operate the controller in external trigger mode.
When the timer is ON, the camera will be on. When the timer is OFF, the camera will be OFF. Use the One Button Mode camera menu or scripts to program what the camera does when it is on.
The HERO3 Black, HERO3+ or HERO4 camera will remain on according the script saved to the SD card. If the script turns the camera off while the timer is enabled, the camera will be turned on again and the script will be repeated.
After the timer stops, the HERO, HERO2, or HERO3 White camera will remain on for theshoot time as programmed using the instruction in the programming section.The default shoot time is 5 seconds, which compensates for the start up delay when the camera turns on.If the camera itself is set in time lapse mode, it will take shots every 1,2,5,10,30 or 60 seconds during the time it is on. If you want to take time lapse photos with a longer interval or to conserve battery life in the 30 or 60 second modes, use theEnable Schedule (1110) method with a time lapse setting to turn the camera on and off after each photo.
Enable Time Lapse on a Schedule
A popular request has been for a time lapse capture which only occurs during certain hours on certain days, such as 9 to 5 on weekdays. Another request has been to begin a time lapse sequence at a certain time and day (Saturday afternoon, for example) using a camera mounted several days before an event. The Programmable Scheduler was originally created as a custom project to meet these needs for one of our clients.
1110 Enable mode will execute the time lapse program only during the times the timer is ON.
First, program the desired time lapse interval, as described below, to set the repeat cycle and shoot time. After programming the time lapse cycle, set the dip switches to1110 (on-on-on-off) and plug the controller into the back of the camera.
The timer can now be programmed to implement the time lapse sequence at a given time, or for certain times of the day. Remember to program a start and stop time for each step and to leave the timer in the AUTO mode.
The default mode after areset is one photo (camera on for 5 seconds) every minute. This can also be used with the timer to capture a single photo at a set of scheduled times and maximize battery life.
Time Lapse Mode
Time Lapse Mode with the1111 dip switch setting ignores the Programmable Scheduler’s LCD timer display and runs the programmed time lapse in 24 hour mode.
1111. When you receive the controller it will be preprogrammed for one photo every minute.
- HERO, HERO2 and HERO3 White: Use the GoPro settings menu to set up One Button Mode on the camera.HERO3 Black, HERO3+ and HERO4: Install the script on an SD card and insert it back into the camera.
- Turn the camera OFF.
- Set the dipswitches on the controller to 1111 - all 4 switches ON.
- Plug the controller into the HERO Port on the back of the camera.
- If the camera comes on when you insert the contorller, do not turn the HERO, HERO2 or HERO3 White off manually. Allow the controller to take control and turn off the camera. If your camera script is too long, you can turn off the camera manually.
The default cycle is 60 seconds. The camera will come on, take a picture and turn off again. A minute later, it will repeat this process. When you are done, simply remove the controller from the camera.
During the wait period of the cycle, the LED will flash briefly once every 15 seconds to indicate the timer is working. When the camera is on, the LED will flash once per second.
The timing cycle can be custom programmed by following the instructions described under “Changing the Time Lapse Shoot Time and Repeat Cycle Time” :
| DIP | FUNCTION |
| 0110 | Camera is on when timer is on. |
| 1110 | Time lapse when timer is on. |
| 1111 | Time lapse - timer is ignored. |
| 0000 | Program the shoot time and cycle time. |
| 0101 | Program the shoot time and cycle time x60. |
| 0100 | Program the shoot time and cycle time x600. |
| 0010 | Test Mode - lights LED only. |
| 1010 | Factory Reset - all custom user settings erased. |
| 1011 | Switch camera type between HERO2 and HERO3 Black. |
WARRANTY: For a period of up to 90 days from the date of purchase CamDo agrees to replace the product in the event of failure due to defects in materials or workmanship. This warranty does not cover malfunctions caused by misuse or force majeure.
LIMITATION ON LIABILITY. THE REPLACEMENT WARRANTY IS THE WHOLE AND SOLE LIABILITY FOR THE PRODUCT. THERE ARE NO OTHER WARRANTIES, EXPRESSED OR IMPLIED. YOUR USE OF THIS PRODUCT CONFIRMS AGREEMENT THAT CAMDO AND ITS DISTRIBUTORS WILL NOT BE LIABLE FOR ANY DAMAGES ARISING FROM OR RELATING TO CAMDO PRODUCTS.