Bullet User Manual
May 11, 2016 - v1.1

1. Introduction
This manual describes how to get started with your CamDo Bullet. The CamDo Bullet is a low power device that interfaces with HERO3+ Black, HERO4 Silver, and HERO4 Black cameras. The Bullet gives the user the ability to turn on, turn off and trigger the camera’s shutter button through a wired interface such as a camera shutter release (sold separately).
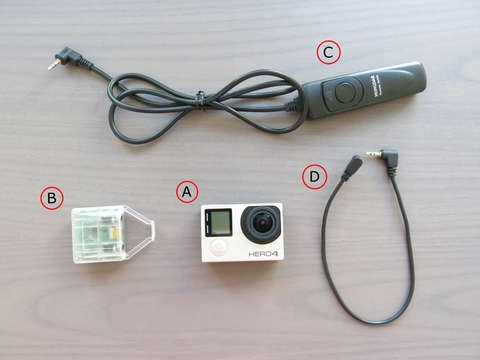
A.GoPro HERO3+ Black, HERO4 Silver, or HERO4 Black camera (optional purchase or bring your own)
B.CamDo Bullet
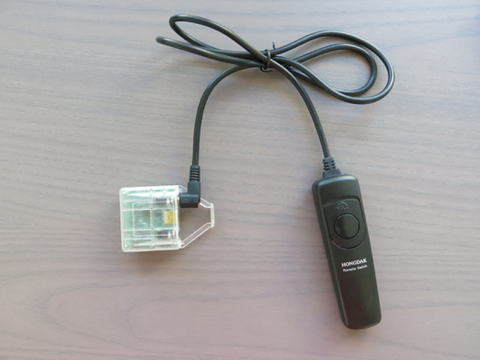
C.Shutter release button with LED indicator (sold separately here)
D.2.5mm patch cable (used for multi camera setups or custom trigger)
2. Connecting a Single Camera
- Ensure that your camera’s firmware is up to date. See here for more details on updating your camera firmware from the GoPro website. For HERO3+ Black and HERO4 cameras, the firmware should be updated to v03.00 or higher.
- Insert a GoPro recommended SD card into the camera. Recommended SD cards can be found here.
- Connect the shutter release button to the IN jack of the CamDo Bullet.
- Hook the latch mechanism on the end of the CamDo Bullet to the indent on the edge of the camera.
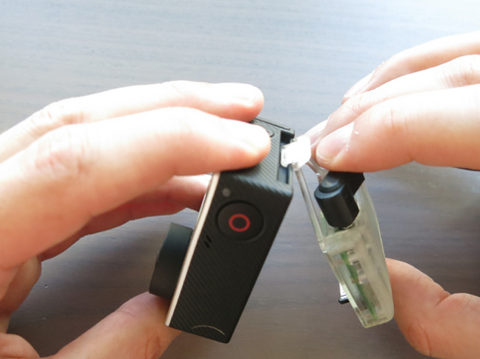
- Use the latch mechanism as a pivot to line up the CamDo Bullet connector into the GoPro HEROPort. It should be firm but insert quite easily. If this is not the case, check your alignment.
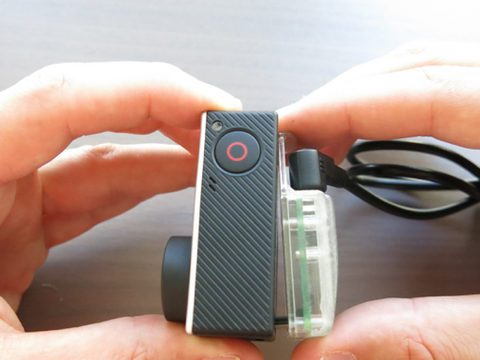
- Once the Bullet is firmly connected to the camera, press the shutter release button once. The camera will take roughly 5 seconds to boot up. This is the same time it takes if you press the power button on the front of the camera. If the camera does not boot up, refer to the troubleshooting section at the end of this guide. The CamDo Bullet board can also be connected to the camera if it is already powered on.
- Once powered on, the shutter release button controls the camera differently depending on the mode that the GoPro camera is in. Refer to Table 1.0 for control details.
| Camera State | Input | Control |
| OFF | Button Press | Turns Camera On |
| OFF | Button Held for ≥ 2 seconds | No Effect |
| ON (Photo Mode) | Button Press | Take Image |
| ON (Video Mode) | Button Press | Start/Stop Video |
| ON | Button Held for ≥ 2 seconds | Turns Camera Off |
3. Connecting Multiple Cameras
One of the powerful features of the Bullet is the ability to control multiple cameras using a single shutter release button.
- Follow steps 1 and 2 from “Connecting a Single Camera” above.
- Connect the shutter release button to the IN jack of the first CamDo Bullet board.
- Connect the OUT jack of the first Bullet board with the IN jack of the second Bullet board using the 2.5mm patch cable. Repeat the process for all cameras in the array.
- Now connect all Bullet boards to their respective cameras using the latch mechanism as a pivot to swing the Bullet connector into the GoPro HERO Port
- With all Bullet boards firmly connected to their cameras, press the release button once. The cameras will take roughly 5 seconds to boot up. This is the same time it takes if you are pressing the power button on the front of the camera. If the cameras do not boot up, refer to the Troubleshooting section at the end of this guide. The CamDo Bullet boards can also be connected to the cameras if they are already powered on.
- Once powered on, the shutter release button controls the cameras differently depending on the modes that they are in. Refer to Table 1.0 for control details. The button presses are emulated through the entire chain of Bullet boards, allowing you to control all cameras simultaneously in the same way.
4. Building a Custom Trigger
*For Advanced Users Only*
It is possible to create your own trigger for the Bullet board by using a 2.5mm stereo audio cable. Connecting the ring to the sleeve through either a relay or transistor will emulate a button press and cause the camera to function as outlined in Table 1.0.

*DO NOT drive a voltage to any of the lines as this may damage the board*
The LED Out pin is 3V at 6mA and will mimic the GoPro's red LED on the front of the camera: flash once to indicate taking a picture, and flash continuously to indicate that the camera is recording, etc.
5. Troubleshooting
My camera doesn’t turn on when I press the shutter release button
Unplug the Bullet board from the camera, wait 5 seconds, then reinsert the board and try again.
If the camera still doesn’t turn on, try removing the SD card and repeating the process. Some SD cards have been known to prevent the camera from powering up from a GoPro accessory.
Make sure the battery is charged.
My camera turns on, but doesn’t take an image or start/stop video
Ensure that your camera’s firmware is upgraded to v03.00 or higher. Earlier versions of the firmware are not compatible with the CamDo Bullet.
Unplug the Bullet from the camera and any cables, wait a couple of seconds, then reinsert and try again