How to Download your GoPro Time Lapse Footage with BlinkX and UpBlink
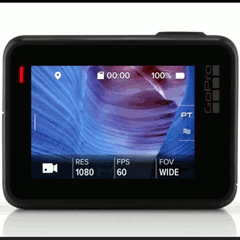
This guide outlines the options available for downloading footage from the GoPro HERO5 cameras during a time lapse when using our BlinkX or UpBlink time lapse controllers. If using a HERO3+ or HERO4 camera, see our download page for Blink.
UpBlink can be scheduled to automatically upload images to our CloudX web server via an internet connection. However, when an internet signal is not available for scheduled uploads, footage can be manually access from the camera while the time lapse is in-progress.
The following options are available with BlinkX and UpBlink:
Physically retrieve the SD card
If you have easy access to the GoPro SD card, this is a simple way to retrieve the footage. If the GoPro camera housing is securely mounted, removing and replacing the GoPro camera to retrieve the SD card should not adjust the positioning of the GoPro camera's view which is important if undergoing a long term time lapse.
What is required?
- GoPro camera
- SD card with U3 rating
- SD card reader
- Computer with slot for SD card reader
If you have an SD adapter for your MicroSD card, you can insert the MicroSD card into the adapter and insert the adapter into your computer to download the footage.
- Remove the SD card from the GoPro camera.
- Insert the microSD card into the SD card adapter and connect the adapter to your computer.
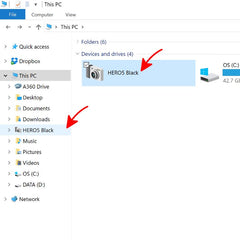
- Open your computer's File Explorer to view your SD card. The SD card should be visible in the left sidebar of the File Explorer.
- Click to view your SD card and Double-click on the DCIM folder to view all footage captured by the GoPro camera. In this folder, you should see a folder named 100GOPRO.
(If you took more than 9999 pictures or videos, you'll see additional folders named 101GOPRO, 102GOPRO, etc. that will each contain the next batch up to 9999 pictures/videos). - Select all files inside the DCIM folder and drag & drop (or cut & paste) the files from your SD card to your computer. Depending on the length of your shoot, you might want to clear your SD card once you have successfully transferred the footage.
- Return the SD card to the GoPro camera.
NOTE: The SD card can be removed and replaced without affecting the BlinkX's shooting schedule. If the SD card is not inside the camera or is full when a trigger is scheduled, BlinkX will turn the camera on and off at the programmed interval, but no image will be taken since there is no space for the GoPro camera to save the file.
Leave the GoPro's WiFi Signal Always Active
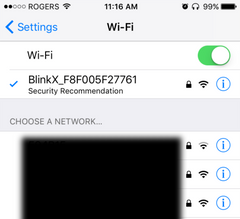
If the camera is not easily accessible, the GoPro's WiFi signal can remain active throughout the project when using BlinkX for downloading and clearing the footage from the SD card via the GoPro app. However, it is important to note that keeping the GoPro camera's WiFi always active will consume considerably more power and is better suited for AC powered operation or when only taking a few photos per day with our solar enclosures.
What is required?
- GoPro camera
- SD card with U3 rating
- Smartphone or Tablet with WiFi
- GoPro App
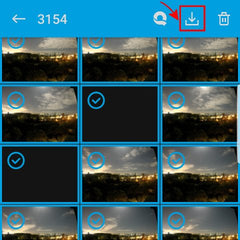
The GoPro's WiFi can be used to download and clear footage from the SD card. Note that you must be within range of the GoPro's WiFi signal to connect to the camera using the GoPro App. Do not download images during an active time lapse schedule since accessing the SD card footage will prevent the shutter trigger.
Camera pairing instructions can be found on GoPro's website here.


Note: some images may not show a thumbnail preview.


Note: Do not download images during an active time lapse schedule as this will interrupt the time lapse capture process. Download footage only when the capture schedules are not active.
Schedule an Active GoPro WiFi Window
Use BlinkX to schedule a set time and duration for the GoPro's WiFi to turn on for downloading and clearing the SD card using the GoPro App.
What is required?
- GoPro camera
- SD card with U3 rating
- BlinkX with firmware v1.01 or newer
- Smartphone or Tablet with WiFi
- GoPro App
The GoPro's WiFi can be used to download and clear footage from the SD card. Note that you must be within range of the GoPro's WiFi signal to connect to the camera using the GoPro App.
BlinkX Scheduled Window to activate the GoPro's WiFi Signal.
BlinkX allows for you to schedule a "Camera WiFi Window" that will turn the camera's WiFi signal on for a set period of time for accessing the SD card footage via the GoPro App. Ensure this WiFi downloading window time does not overlap with another active shooting schedule (avoid conflicting schedules).
If the AUTO OFF setting is used, it might automatically turn the camera off before you have a chance to access the camera. The Session camera cannot adjust the AutoOff setting.
- Turn on the GoPro Camera.
- Swipe the screen downward to access the PREFERENCES menu.
- Scroll through the menu until you reach the AUTO OFF setting, which is under the GENERAL settings section.
- Click AUTO OFF to adjust the timer's setting.
- Scroll to and select the NEVER option.
- Exit the menu by pressing the mode button on the side of the camera, or turn off the camera by holding the mode button.

Camera pairing instructions can be found on GoPro's website here.
- Enter the date range you would like the Camera's WiFi Window to be active.
- Click the days of the week to enable the schedule for that day. Days that are enabled are highlighted in blue indicating they are active.
- Set the desired Start Time for the Camera's WiFi Window to start.
- Select “Intervalometer” with an interval of "once" under the “Select a mode” menu.
- Select "Camera WiFi Window" under the “Select an action” menu and set the amount of time you would like the camera's WiFi window to remain active for access via the GoPro App.
- Click the "Enable button" to enable the Camera WiFi Window schedule. The Enable button and Schedule should be highlighted in blue indicating they are active.
- Click the “Save All” button once all desired schedules have been programmed and enabled.

Note: some images may not show a thumbnail preview.
Do not download images during an active time lapse schedule as this will interrupt the time lapse capture process. It is important that the Camera WiFi Window schedule for downloading footage should not be set during an active time lapse schedule.
For example, say you want to capture time lapse footage Monday to Friday between 8am and 6pm every day, capturing an image every 15 minutes. The GoPro's WiFi download window (Camera WiFi Window) schedule would need to be set outside of these times. An option for the download window could be every day at 6:01pm after the time lapse schedule had finished for the day. The schedules would thus be:
Schedule 1 - Monday to Friday, 8am to 6pm - Mode: Intervalometer every 15 minutes - Action "Photo-Day".
Schedule 2 - Friday, 6:01pm - Mode: Intervalometer once - Action: "Camera WiFi Window" for 3600seconds (one hour).
Schedule a Window for Download via USB cable
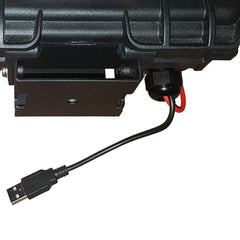
BlinkX has power and data passthrough from the microUSB Port to the GoPro camera. If you don't have easy access to the camera, for example, its high up in one of our outdoor enclosures, a USB cable can be attached to BlinkX's microUSB port and run down to ground level for downloading the images. A standard USB splitter cable* can be used to power Blink from an external power supply, such as our V44 battery, while the USB data connection is available for downloading footage from the camera.
If not using a splitter cable with the USB cable used for constant mains power to BlinkX, the USB cable can be switched from the USB power adapter to the computer for the download period. The USB data (computer connection) must be connected before the camera is turned on for the download.
What is required?
- GoPro HERO5 camera (HERO6 & HERO7 will not mount)
- SD card with U3 rating
- BlinkX
- Computer or Tablet with USB port
- Micro USB cable
- USB splitter cable*
- USB repeater cable** (optional)
*A splitter cable is not included with BlinkX. The supplied cable is an "OTG cable" that has a different pinout used for BlinkX firmware updates and does not function as a standard USB splitter cable.
**USB cables have a normal maximum length of about 5 meters (16.4 feet), but you can get longer distances for data transmission by using an Active/Passive USB Repeater Cable. USB Repeater Cables are for data only and the GoPro camera should not be powered from a USB cable longer than 5 meters.
For the camera to enter USB mode, the camera must be turned on while connected to a computer. The computer should not remain connected during an active shooting schedule since the camera's shutter cannot be triggered when the GoPro camera is in USB mode.
BlinkX Scheduled Camera On Window.
BlinkX allows for you to schedule a "Camera On" window that will turn the camera on for a set period of time with no capture/shutter functions. This can be used to schedule a window that the camera can be accessed via a USB cable. This downloading window should be set while there are no active capture schedules, since the camera cannot be triggered while accessing the SD card and a failed camera trigger may result in a camera reset.
If the AUTO OFF setting is used, it might automatically turn the camera off before you have a chance to access the camera. The Session camera cannot adjust the AutoOff setting.
- Turn on the GoPro Camera.
- Swipe the screen downward to access the PREFERENCES menu.
- Scroll through the menu until you reach the AUTO OFF setting, which is under the GENERAL settings section.
- Click AUTO OFF to adjust the timer's setting.
- Scroll to and select the NEVER option.
- Exit the menu by pressing the mode button on the side of the camera, or turn off the camera by holding the mode button.
- Enter the date range you would like the Download Window to be active.
- Click the days of the week to enable the schedule for that day. Days that are enabled are highlighted in blue indicating they are active.
- Set the desired Start Time for the Download window to start.
- Select “Intervalometer” with an interval of "once" under the “Select a mode” menu.
- Select "Camera On" under the “Select an action” menu and set the amount of time you would like the download window to remain active.
- Click the "Enable button" to enable the download window schedule. The Enable button and Schedule should be highlighted in blue indicating they are active.
- Click the “Save All” button once all desired schedules have been programmed and enabled.

*An "OTG cable" is included with BlinkX that does not function as a splitter cable.
**An Active/Passive USB Repeater Cable is required for data transfer lengths over 5 meters.
The computer should not remain connected during an active shooting schedule since the camera's shutter cannot be triggered when the GoPro camera is in USB mode.

In the DCIM folder, you should see a folder named 100GOPRO that contains the individual images and videos.
If you took more than 9999 pictures or videos, you'll see additional folders named 101GOPRO, 102GOPRO, etc. that will each contain the next batch up to 9999 pictures/videos


It is important that the USB Download Window schedule should not be set during an active time lapse schedule
For example, say you want to capture time lapse footage Monday to Friday between 8am and 6pm every day, capturing an image every 15 minutes. The USB download window (camera on) schedule would need to be set outside of these times. An option for the download window could be every day at 6:01pm after the time lapse schedule had finished for the day. The schedules would thus be:
Schedule 1 - Monday to Friday, 8am to 6pm - Mode: Intervalometer every 15 minutes - Action "Photo-Day".
Schedule 2 - Friday, 6:01pm - Mode: Intervalometer once - Action: "Camera On" for 3600seconds (one hour).
Activate the GoPro via the Blink UI's manual controls buttons
UpBlink and BlinkX's WiFi Access Point can be triggered using a wired remote attached to Port1. The Blink web interface allows for manual control triggers to either activate the GoPro's WiFi for downloading via the GoPro App or to turn the camera on for download via a USB cable.
Accessing Blink's WiFi also allows for the adjustment of schedules.
What is required for WiFi download?
- GoPro camera
- SD card with U3 rating
- UpBlink or BlinkX
- Smartphone or Tablet with WiFi
- Wired Remote
- Remote extension cable
What is required for USB download?
- GoPro HERO5 camera (HERO6/7/8/9 will not mount)
- SD card with U3 rating
- BlinkX
- Computer with USB port
- Wired Remote
- Remote extension cable
- USB splitter cable*
- USB repeater cable** (optional)
*A splitter cable is not included with BlinkX. The supplied cable is an "OTG cable" that has a different pinout used for BlinkX firmware updates and does not function as a standard USB splitter cable.
**USB cables have a normal maximum length of about 5 meters (16.4 feet), but you can get longer distances for data transmission by using an Active USB Extension/Repeater Cable. Active/Passive USB Repeater Cables are for data only and the GoPro camera should not be powered from a USB cable longer than 5 meters.
For the camera to enter USB mode, the camera must be turned on while connected to a computer. The computer should not remain connected during an active shooting schedule since the camera's shutter cannot be triggered when the GoPro camera is in USB mode.
Note that you must be within range of the Blink's WiFi signal to connect to the controller and access the manual controls.
Wired remote trigger for Manual Controls
BlinkX's "Manual Controls" buttons can be used to turn on the GoPro camera so that the GoPro can enter USB mode. The BlinkX's WiFi Access Point can be activated to access Manual Controls by using a 3second button press from a wired remote. We offer 2.5mm extension cables at 3ft, 10ft, and 25ft lengths. Both the USB cable and the remote extension cable can be left hanging from the enclosure to be accessed from the ground using the wired remote and computer.
*An "OTG cable" is included with BlinkX that does not function as a splitter cable.
**An Active/Passive USB Repeater Cable is required for data transfer lengths over 5 meters.


1234567890
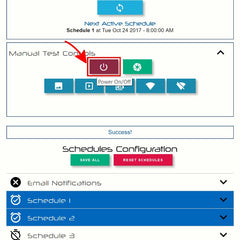
http://192.168.1.1 to access the BlinkX user interface. Click the "Manual Controls" tab to open the menu and press the "Power" button to turn on the GoPro camera.
The computer should not remain connected during an active shooting schedule since the camera communication (shutter/mode/etc.) cannot issued when the GoPro camera is in USB mode.
In the DCIM folder, you should see a folder named 100GOPRO that contains the individual images and videos.
If you took more than 9999 pictures or videos, you'll see additional folders named 101GOPRO, 102GOPRO, etc. that will each contain the next batch up to 9999 pictures/videos
The GoPro's WiFi can be used to download and clear footage from the SD card. Note that you must be within range of the GoPro's WiFi signal to connect to the camera using the GoPro App.
Wired remote trigger for Blink's Manual Controls
The "Manual Controls" buttons can be used to activate the GoPro's WiFi signal. The Blink's WiFi can be activated to access Manual Controls by using a 3second button press from a wired remote. We offer 2.5mm extension cables at 3ft, 10ft, and 25ft lengths. The remote extension cable can be left hanging from the enclosure to be accessed from the ground using the wired remote.
Camera pairing instructions can be found on GoPro's website here.

1234567890
http://192.168.1.1 to access the BlinkX user interface, or for UpBlink navigate to http://10.0.0.5:5000/index.html to access the UpBlink user interface. Click the "Manual Controls" tab to open the menu and press the "WiFi On" button to turn on the GoPro's WiFi signal.
Note: some images may not show a thumbnail preview.
Connecting to the GoPro via the GoPro App will switch your WiFi network to the GoPro camera. You will need to reconnect to Blink's WiFi signal to access the manual controls.

Note: Do not download images during an active time lapse schedule as this will interrupt the time lapse capture process. Download when the schedule is not active.